The Animation GRAND PRIZE winning entry by Jamie Holmes for the CONVERTED Challenge. An exercise at complete world-building and storytelling to boot! Jamie Holmes is no stranger to such a challenge as we’ve seen him doing it previously during the CABINS challenge. Enjoy this one as he takes us for a spin in his process of making of Red Barn.
First, I just want to thank Ronen Bekerman for putting on another excellent competition. Thank you to all the sponsors that supported this competition for supporting the Arch Viz Industry!

Every day I sit in front of some sort of screen looking at plans, elevations, site photos, all someone else’s design. 20 years ago, I trained as an architect. Just when I was on the cusp of getting registered and diving into a career as an architect, my business partner and I started our architectural visualization business.
The “RED BARN” Design
I live and work in Auckland, but I have spent a lot of time on various farms around Waikato, where my parents have been Dairy farmers. I love being out in the country air, mucking in, and getting work done!
A typical dairy farm has a milking shed usually designed for pure efficiency to get the cows in and out, but the farm is also full of ancillary buildings. These buildings are basic and not very attractive (subjective), but they are practical.
It’s probably partly due to growing up in a country with a short history and limited building materials. Still, I believe New Zealand architecture has strong roots in these utilitarian buildings. We don’t have a long historical account of architecture movements, and traditional Māori buildings were efficient and served specific functions.
I have always loved the idea of a rugged, simple, and monolithic building from the outside but refined and intricate on the inside. That was the starting point for the barn conversion.
The exterior needed to still explicitly represent a barn found on any farm, but the interior needed to provide an unpretentious luxury. The interior is simple but refined, and the materials echo the landscape beyond, raw and textural.
The opening roof was an essential element that helped strengthen the barn aesthetic while providing light when open. Conversion within the converted. The running gear for the sliding roof is exposed in each bedroom, and having the mechanical equipment visible creates some drama and is a nod back to early farm machinery.
The interior, while minimal, is honest in both material and exposed structure. The interior needed to give a sense of solidity to balance out the lightweight exterior cladding. Concrete, rolled steel, and schist harmoniously sits together to bring the surrounding nature inside.
References for the “RED BARN”
For me, reference is always an essential part of any project. I collected various references of barns, the landscape, and some interiors I liked to get me started.
The “RED BARN” Landscape
Whenever I start a project like this, I like to try something new. I usually try and tackle a place I have been in person, but I have picked places I haven’t been but really want to go in the past.
This time it is a place I have been lucky to visit a few times!
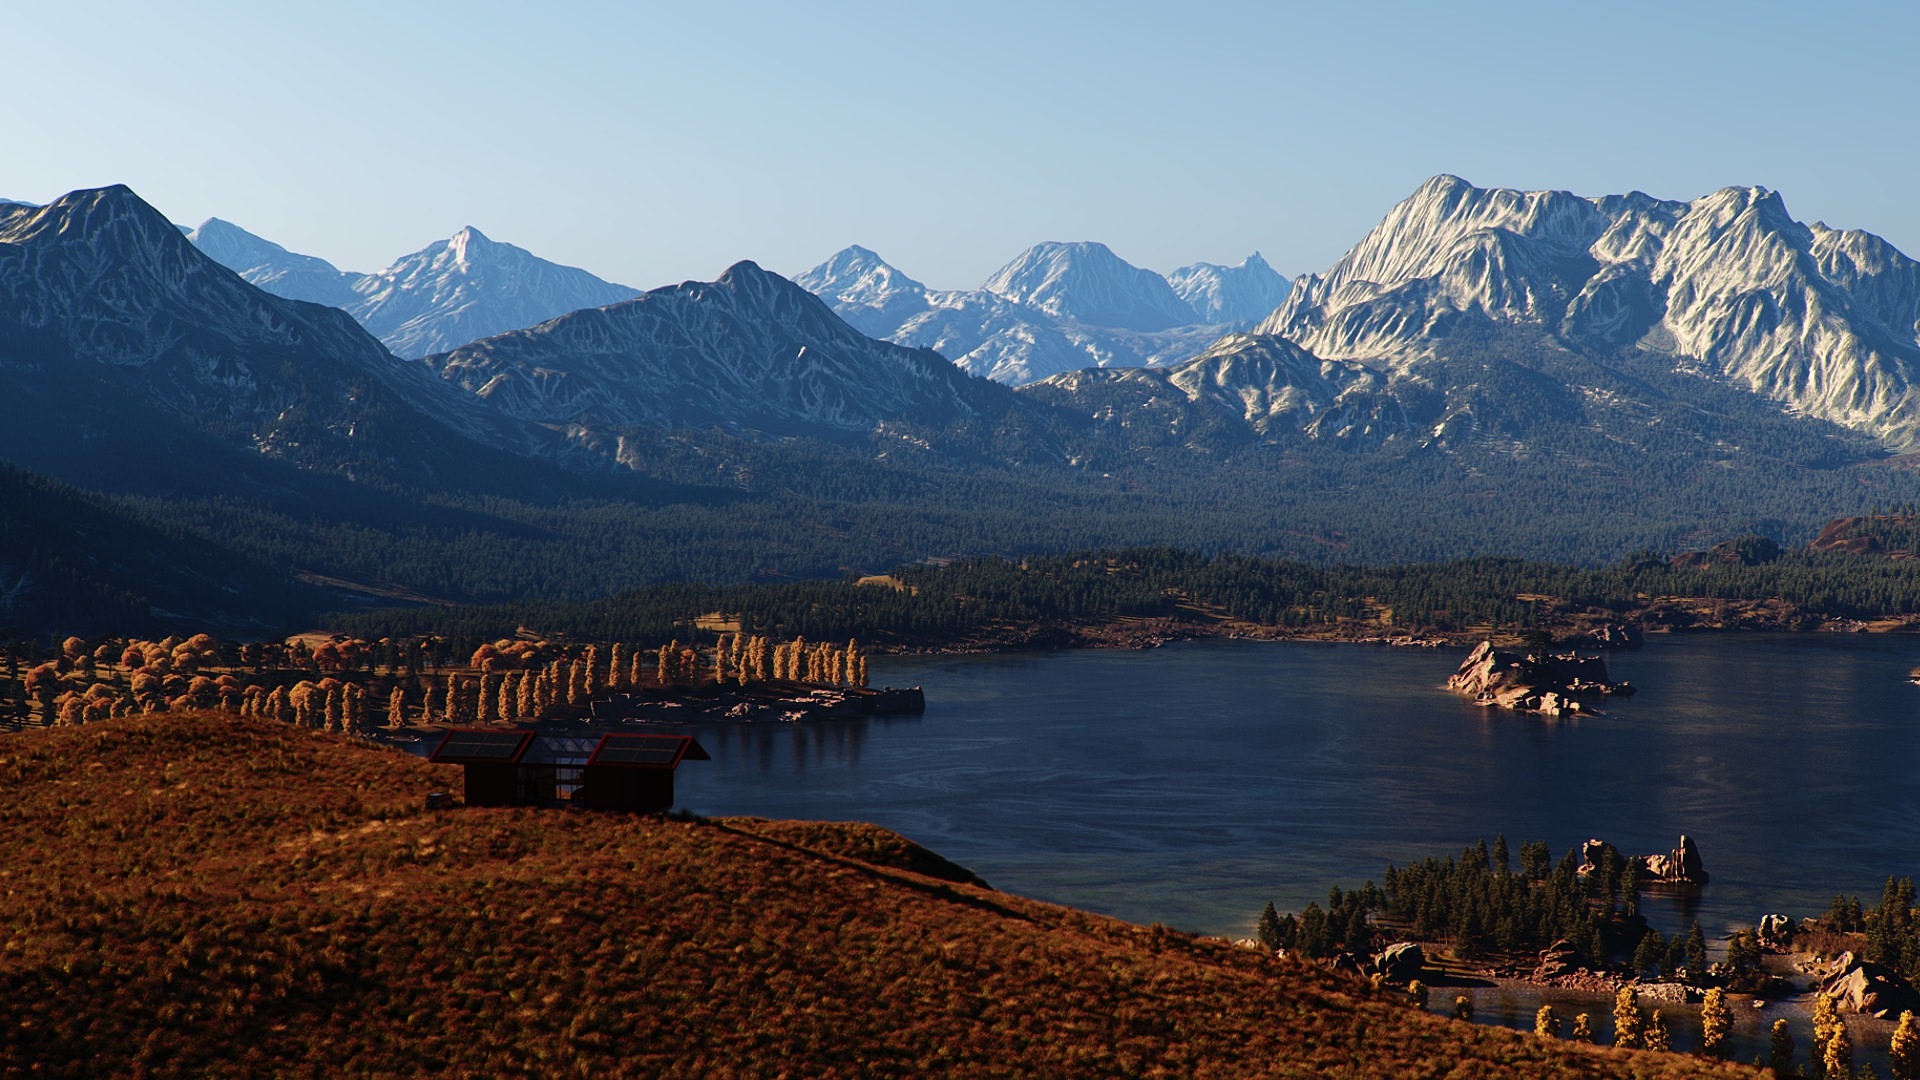
For Converted, I chose to use Central Otago as a reference for the surrounding landscape. This area is rugged but beautiful all year round. What stood out to me most was the color palette of the scenery. Deep yellows, greens and reds, soft browns, and the blue hues as the mountains fade off into the background.

Because the area has quite a significant temperature difference between summer and winter, the fauna is mostly a mix of hearty grasses that survive the harsh conditions. The trees a deciduous – field trees, Poplars, and Pines. The soil is exceptionally rich in color too.
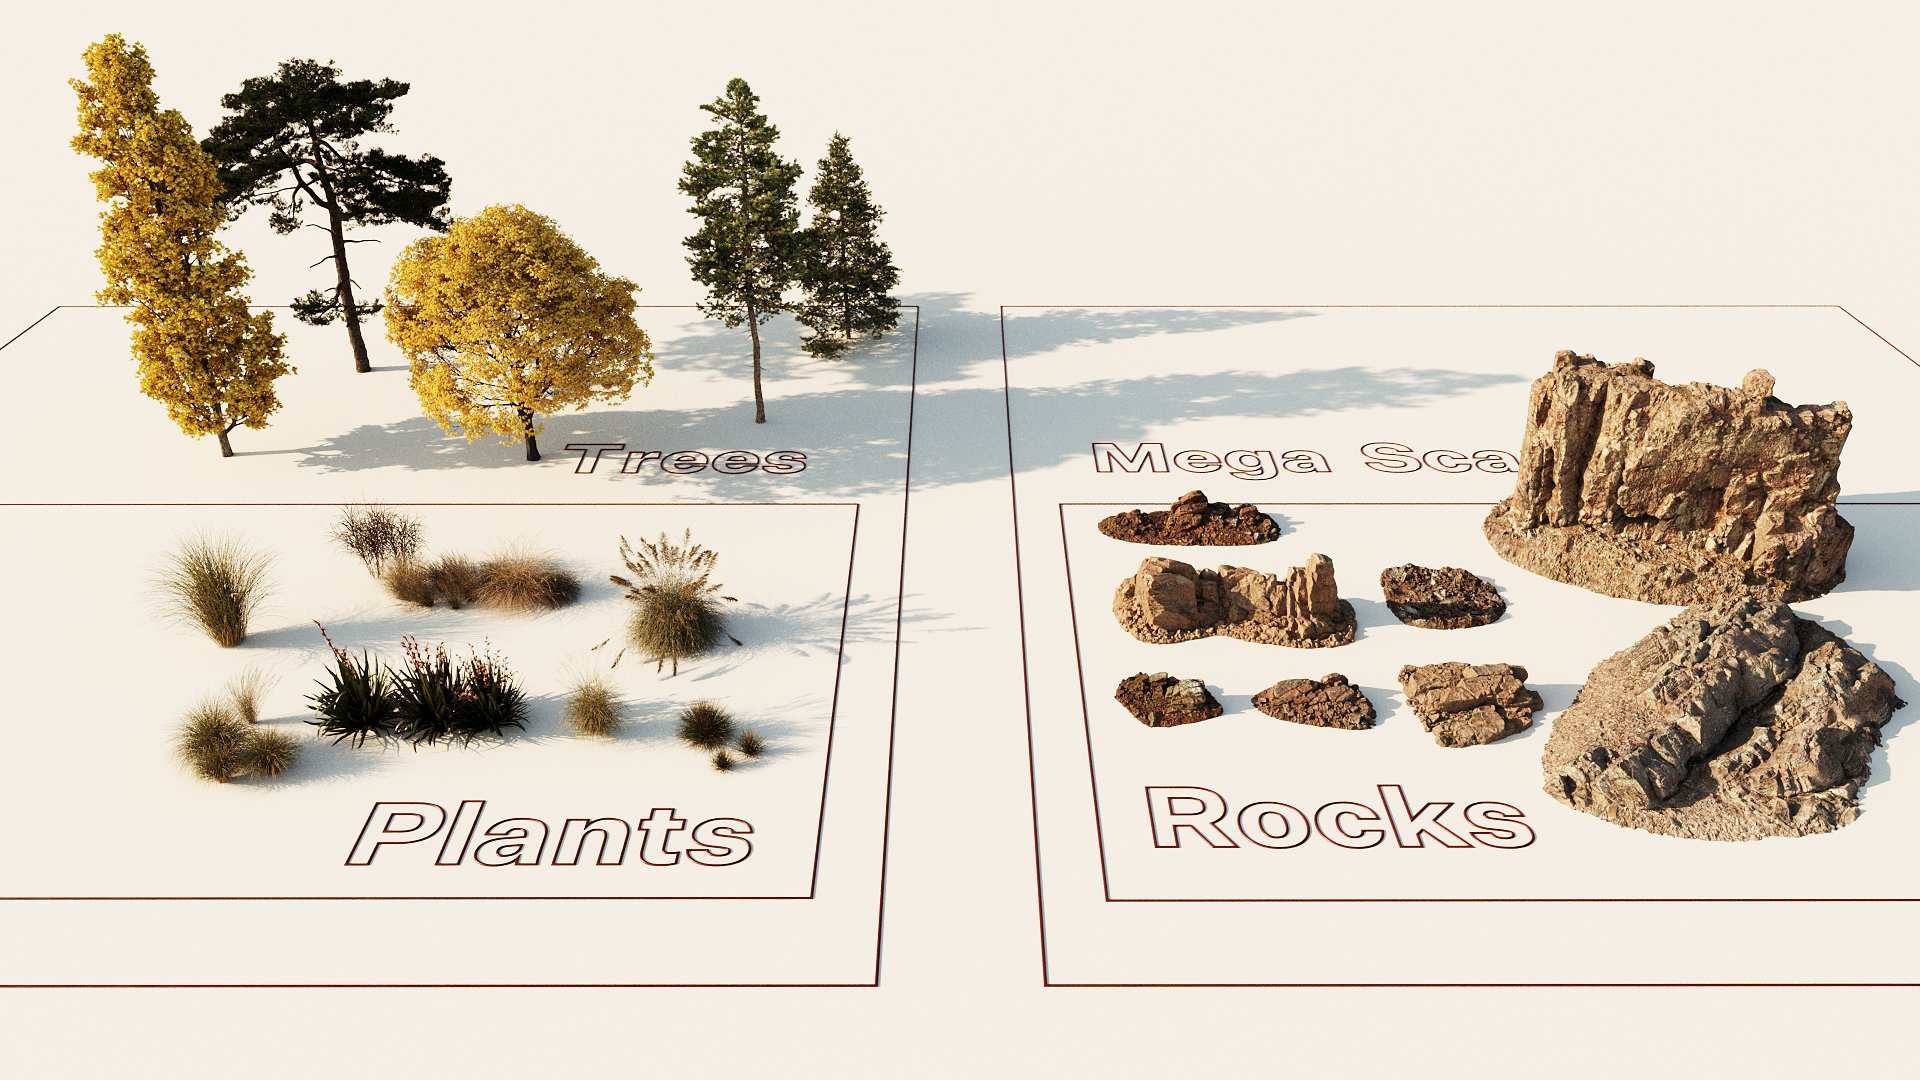
The plants are models from MAXTREE. The materials have been tweaked to match the color in the reference I collected.
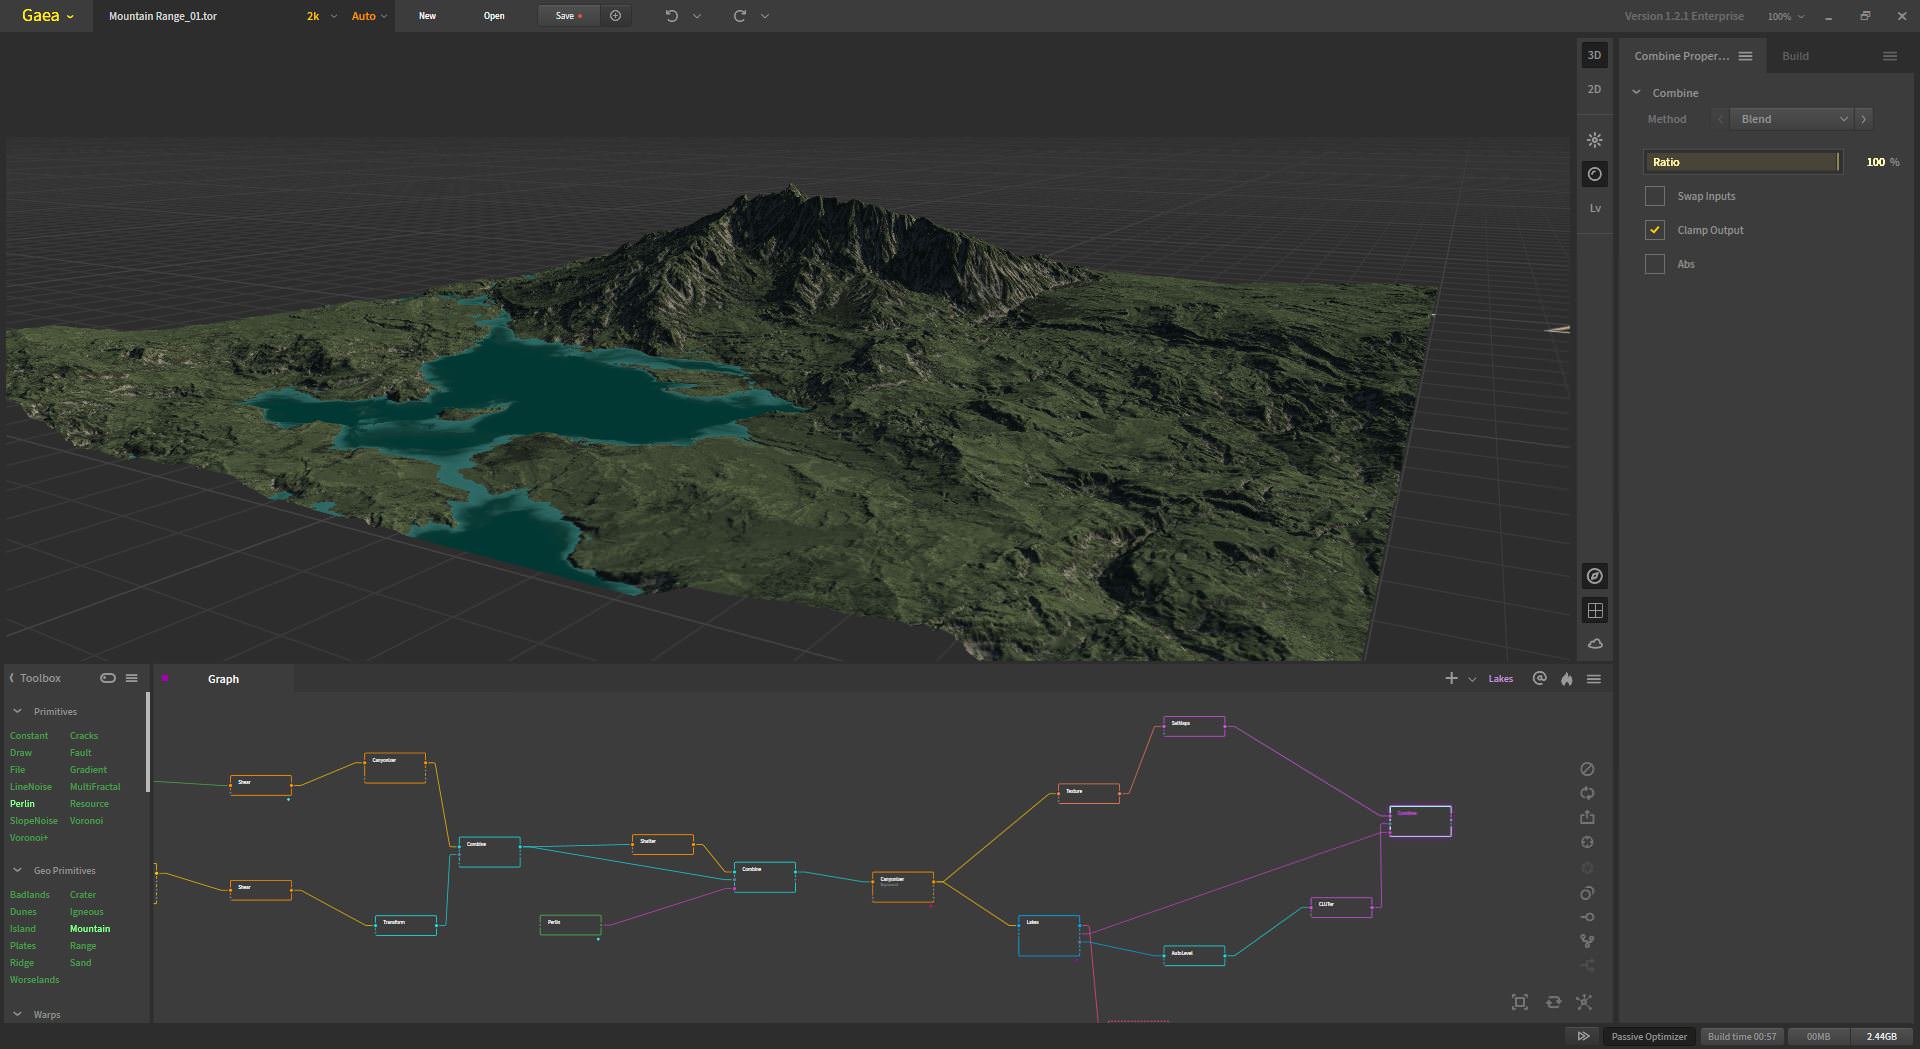
Lakes, mountains GAEA
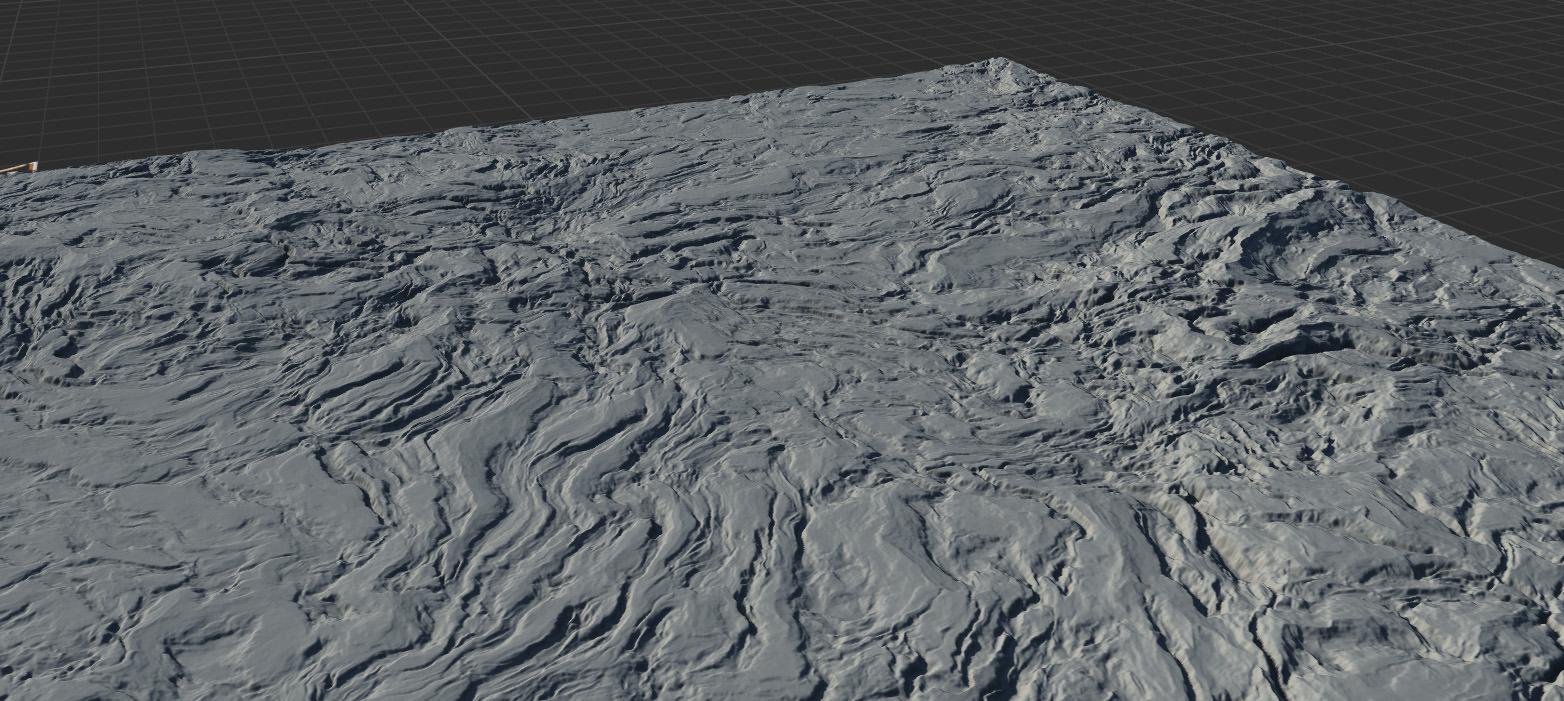
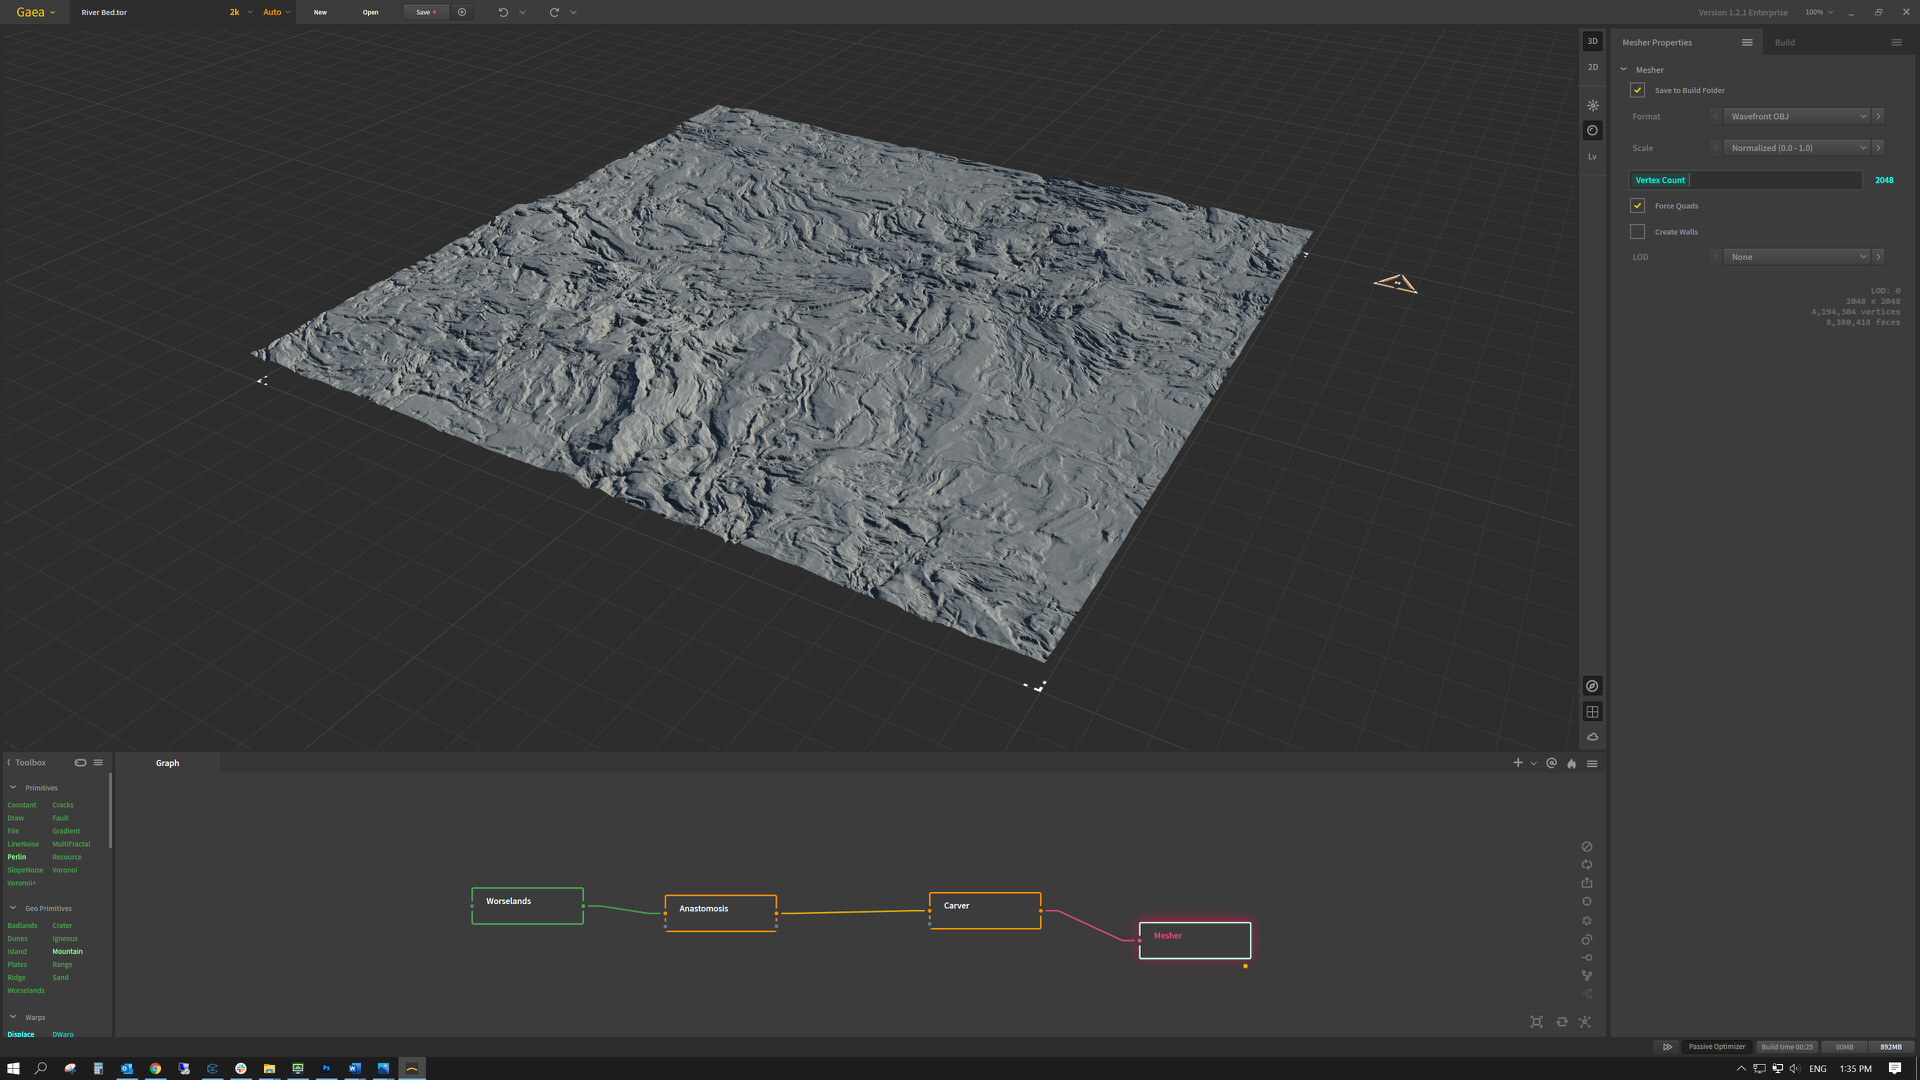
I had the idea early on that the “RED BARN” would be at the top of an exposed grassy hill looking over a lake. Because the surroundings are loosely based on Central Otago and require a mountainous backdrop, I decided to use Gaea to model the terrain.
I had used Gaea once before and really liked how simple it was to use to make simple terrains – it gets a bit more complicated to make more deliberate decisions. I found it worked out well for what I needed to do, which was more freeform sculpting.
There were many trials and errors and changing parameters inside Gaea until I reached something I was happy with.
This was an enjoyable process.


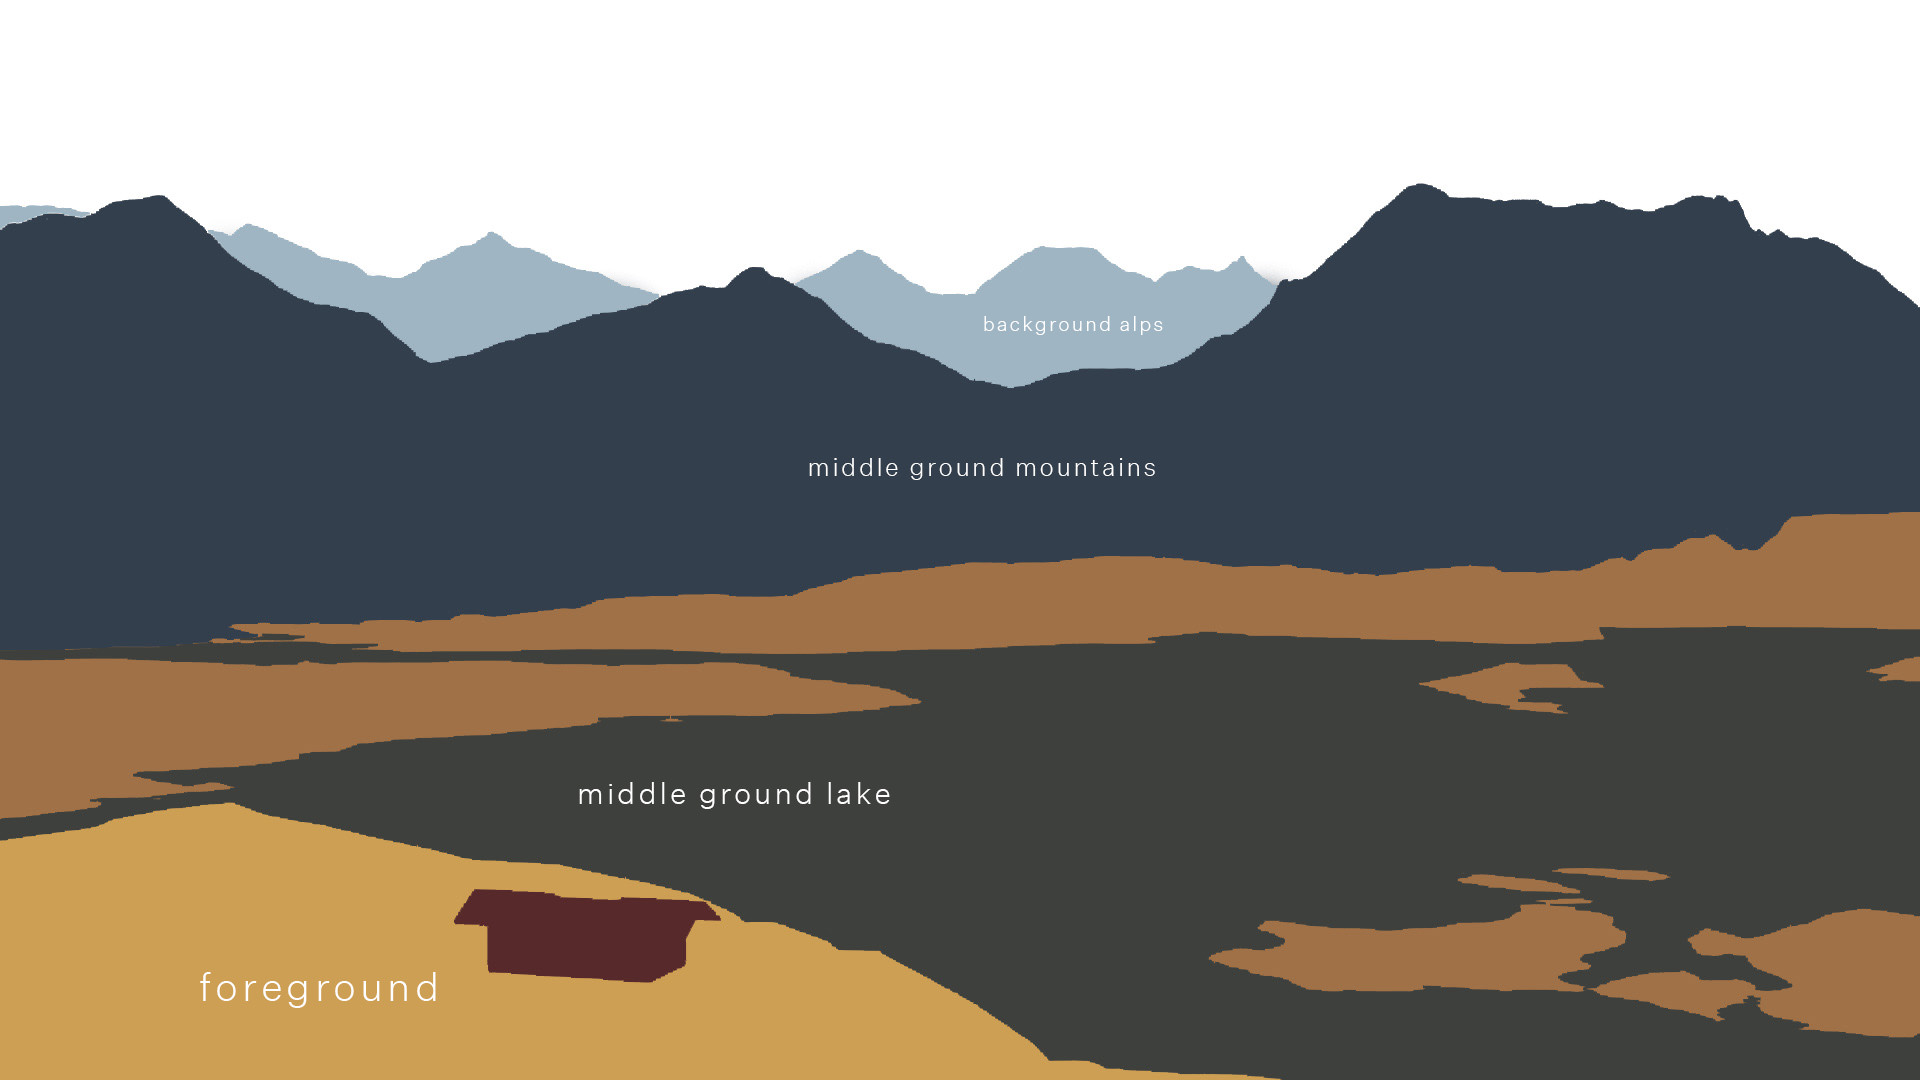
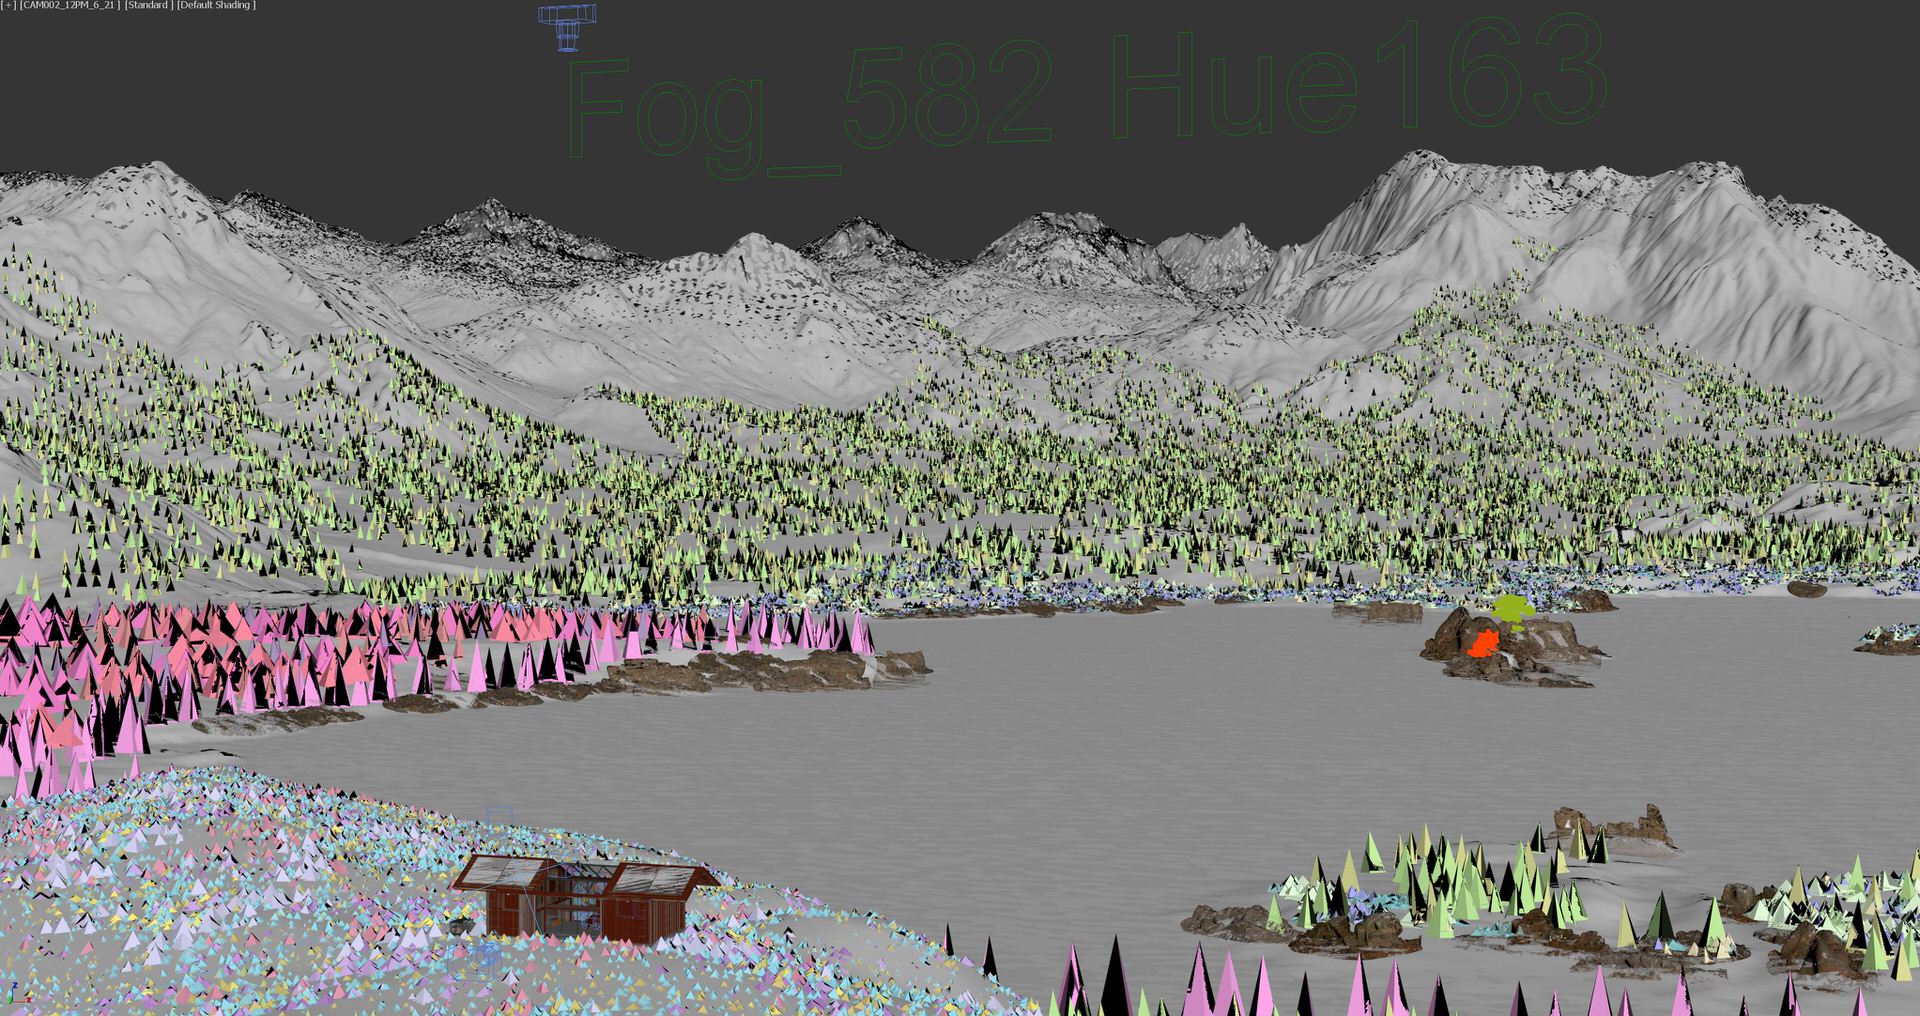
The scene was broken into four parts:
- One part Foreground.
- Two parts Middle-ground.
- …
- One part Background.
The foreground was a simple plane for the Barn’s terrain and a simple flat plane for the interior scenes. For the end shot, it was more contoured to resemble a hill. The Middle-ground was the most significant section that included the lake, which was split into two with the lake and lake frontage, and then the other part was the pine forest leading up to the closest mountains. The background was snow-covered alps.
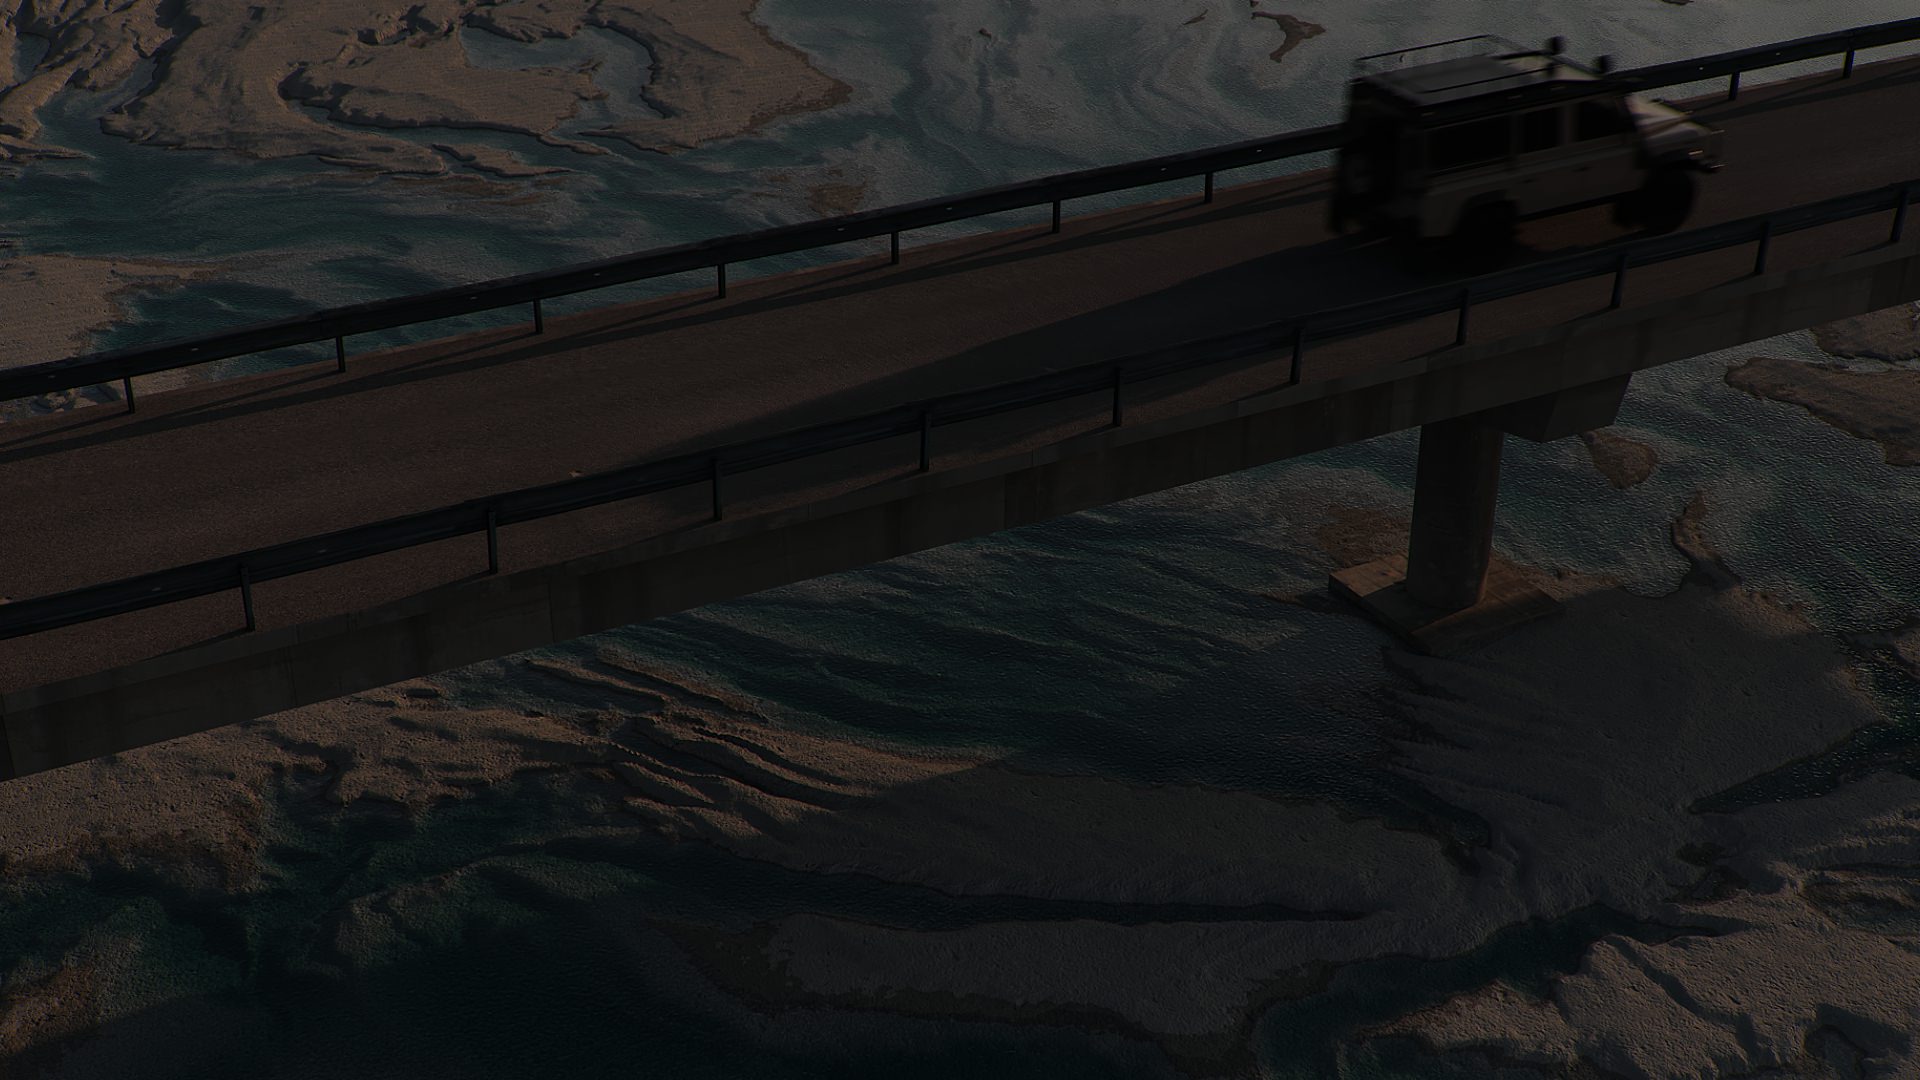
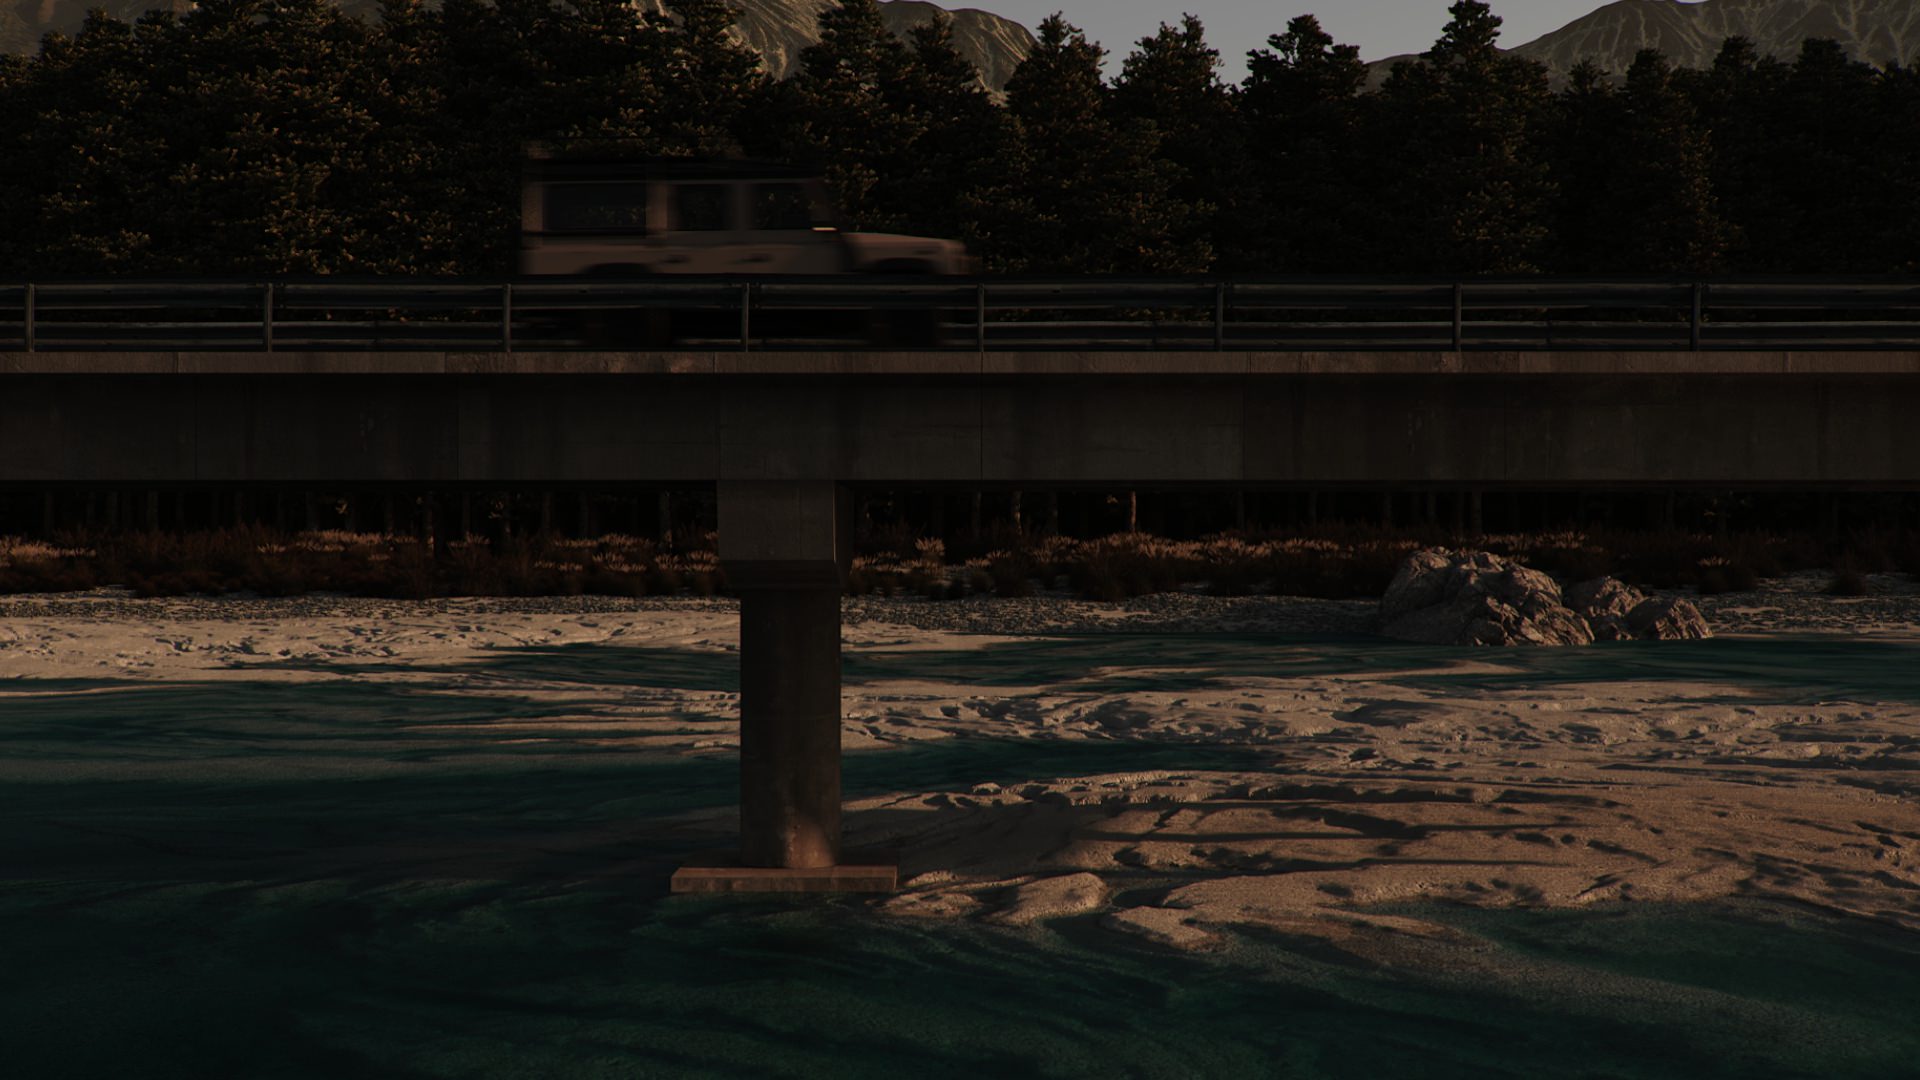
Another part I modeled in Gaea was the riverbed for the opening shots when the Land Rover is driving over the bridge. This was like mountain sculpting, playing with different nodes to achieve a low river where the water is carving streams in the sand.
The Terrain materials are maps generated by Gaea, which I then tweaked in Photoshop to get them to the color I needed.
For the Background Alps, I also created a mask for the snow area to control the material so it didn’t blow out with the lighting. This was done by tweaking the Sat map generated from Gaea.
The ground was mostly covered by vegetation, so no accurate detail was needed there. For the immediate environment visible from the interior cameras, I used a more detailed texture color graded to give a richer red soil color.
The real surprise was the water.
I used the colored SAT map generated from Gaea and desaturated (Color Correction slot) into the Reflection glossiness slot. This worked well to mimic the different subtle currents over the different depths within the lake.
I also used a distance map to help with the water edge – this was applied to the terrain material. The water shader also is set to be more transparent at the surface. (see further down in the materials section)
For the lake edge where the terrain meets the water, I scattered Megascans rock assets. I placed these by hand rather than using a scattering tool. There are two reasons for this. First, I could choose what piece went where to avoid obvious repetition, and second, I could keep the poly count under control by limiting overlap.
All the trees and low planting of the grasses were scattered using iToo Software’s Forest Pack tool for 3ds Max. It has been around a very long time now, so I’m sure most know about it. It lets you scatter thousands of trees/plants or any object very quickly and has various tools to make the objects scale/rotate, cluster, follow a spline, and much more. I like Forest Pack because it is effortless to use, and it gives you a lot of creative freedom within a scattering tool.
The “RED BARN” 3d Modeling
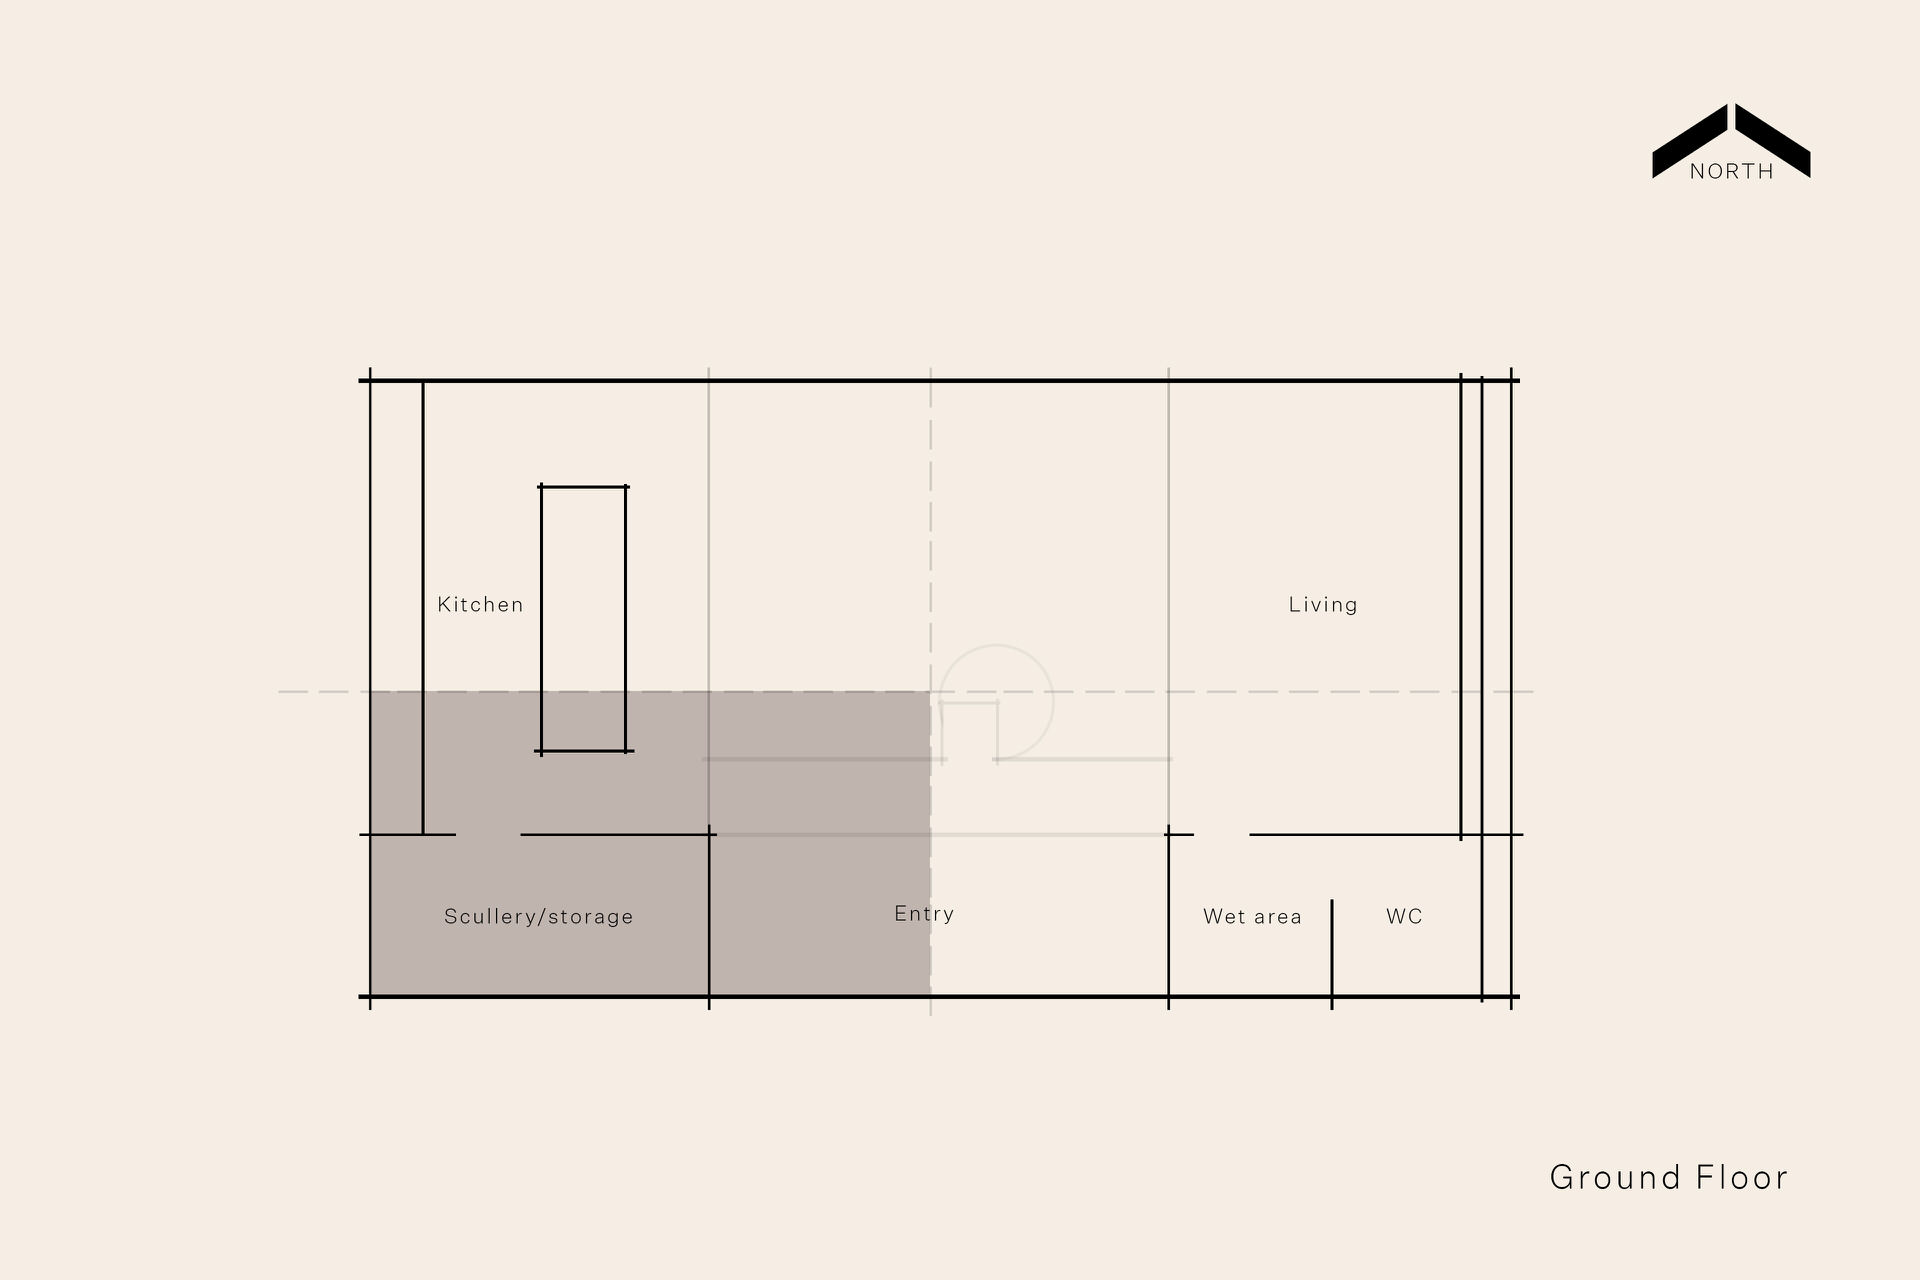
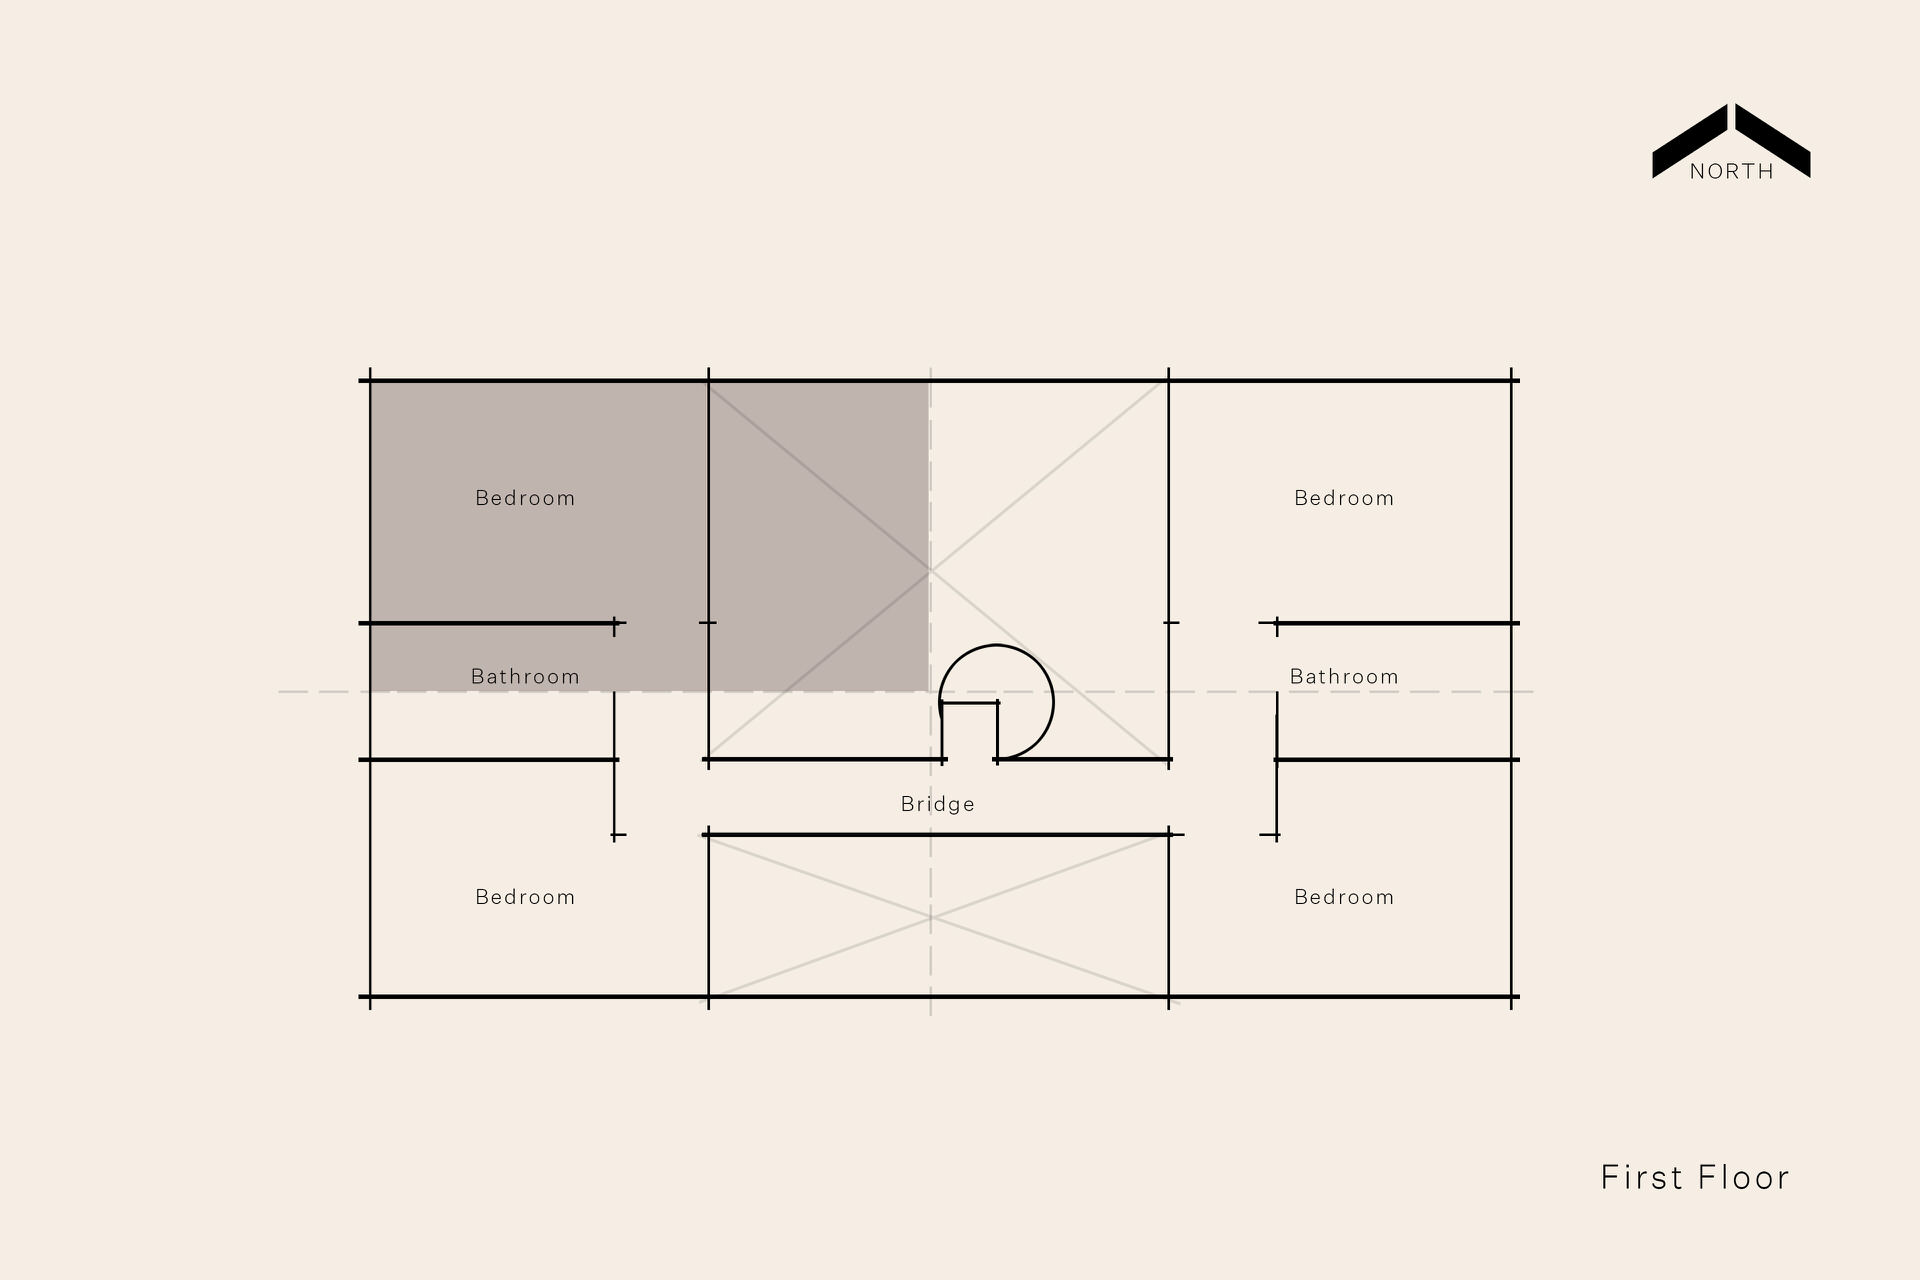
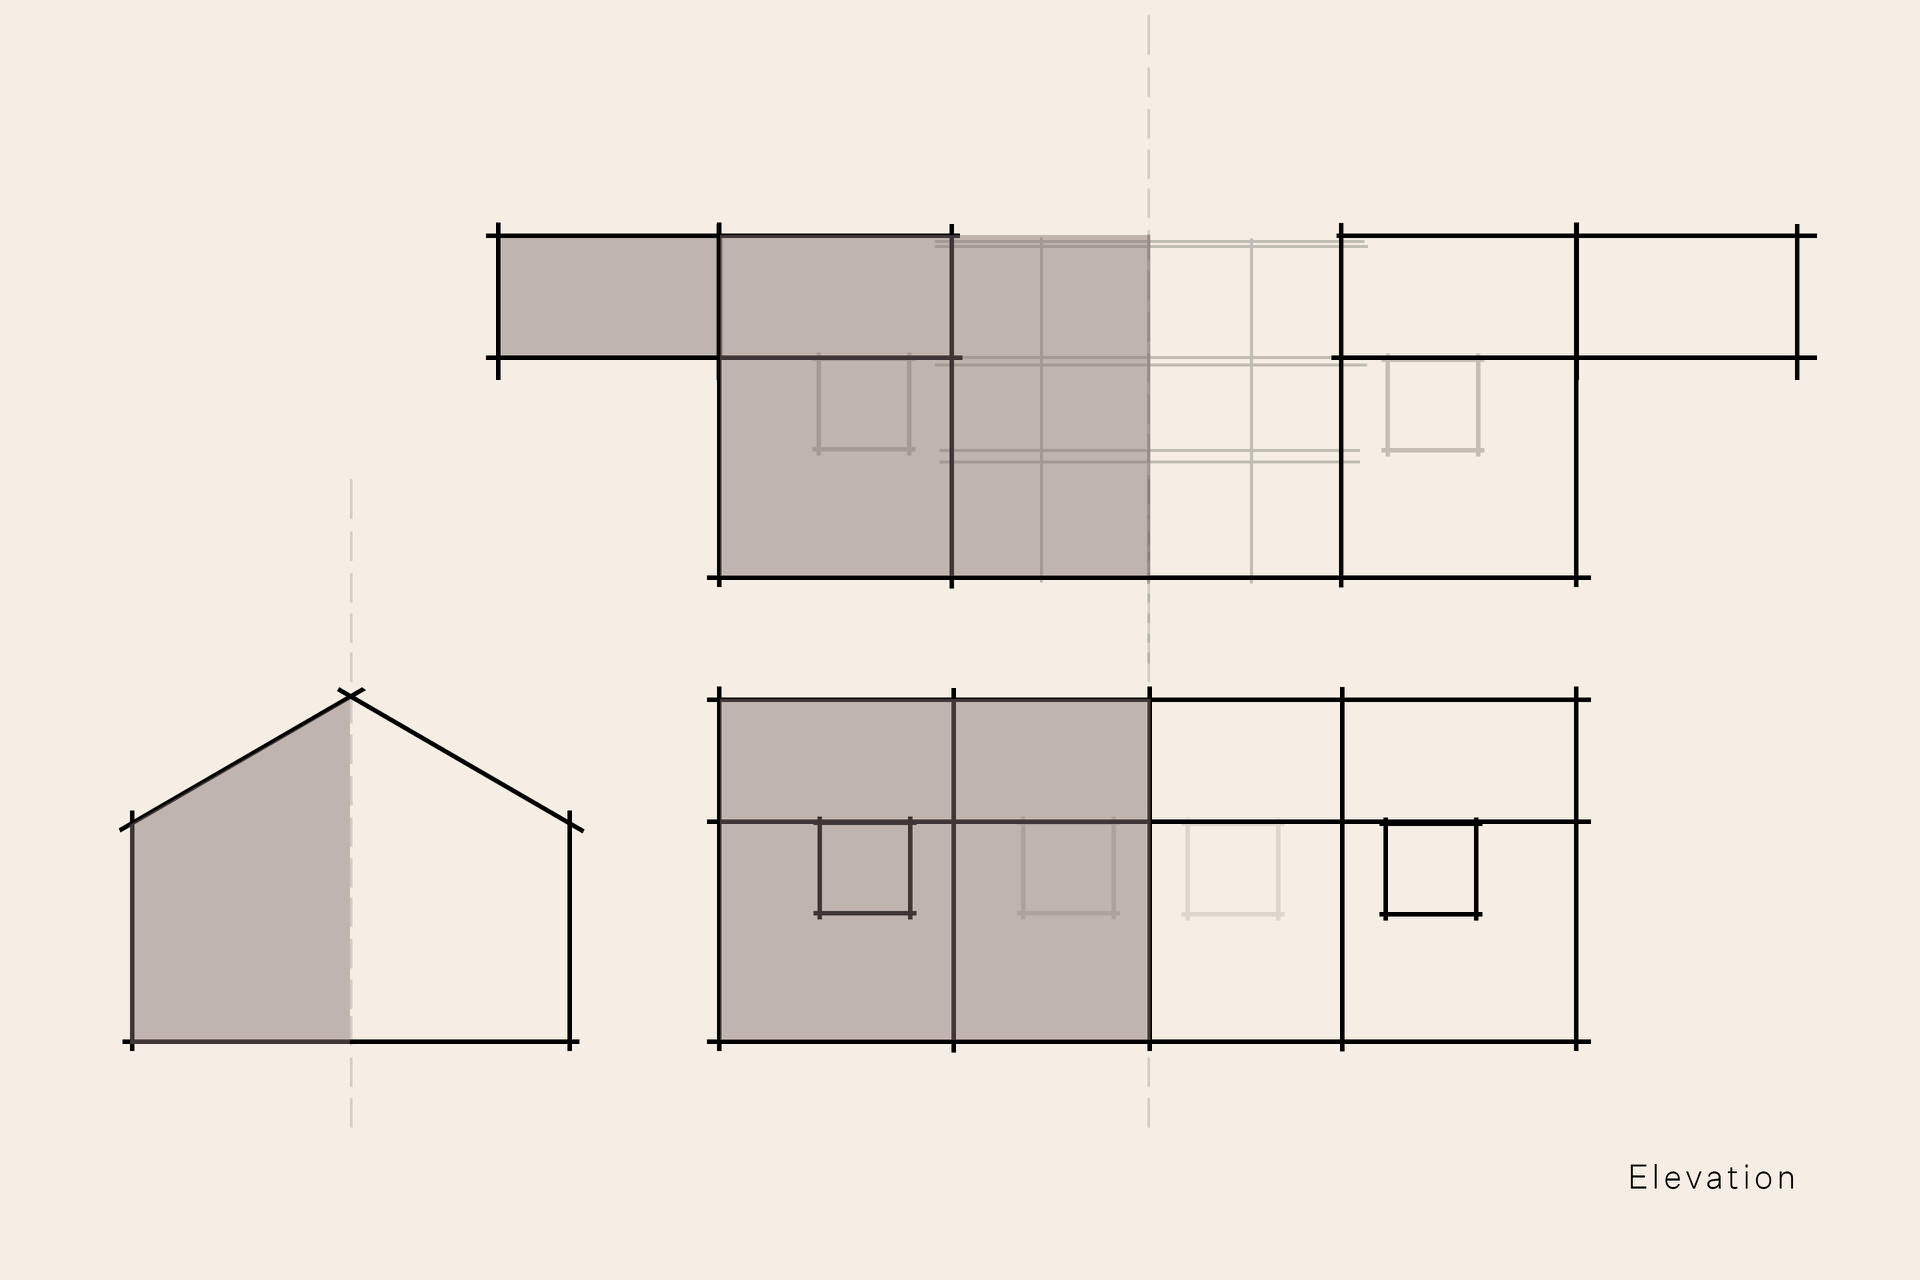
The Barn is primarily symmetrical, breaking it into a quarter when I modeled the initial shell. The only part that wasn’t symmetrical was the interior ground floor, where the atrium splits the kitchen and living. The Spiral stair is offset but is a standalone object.
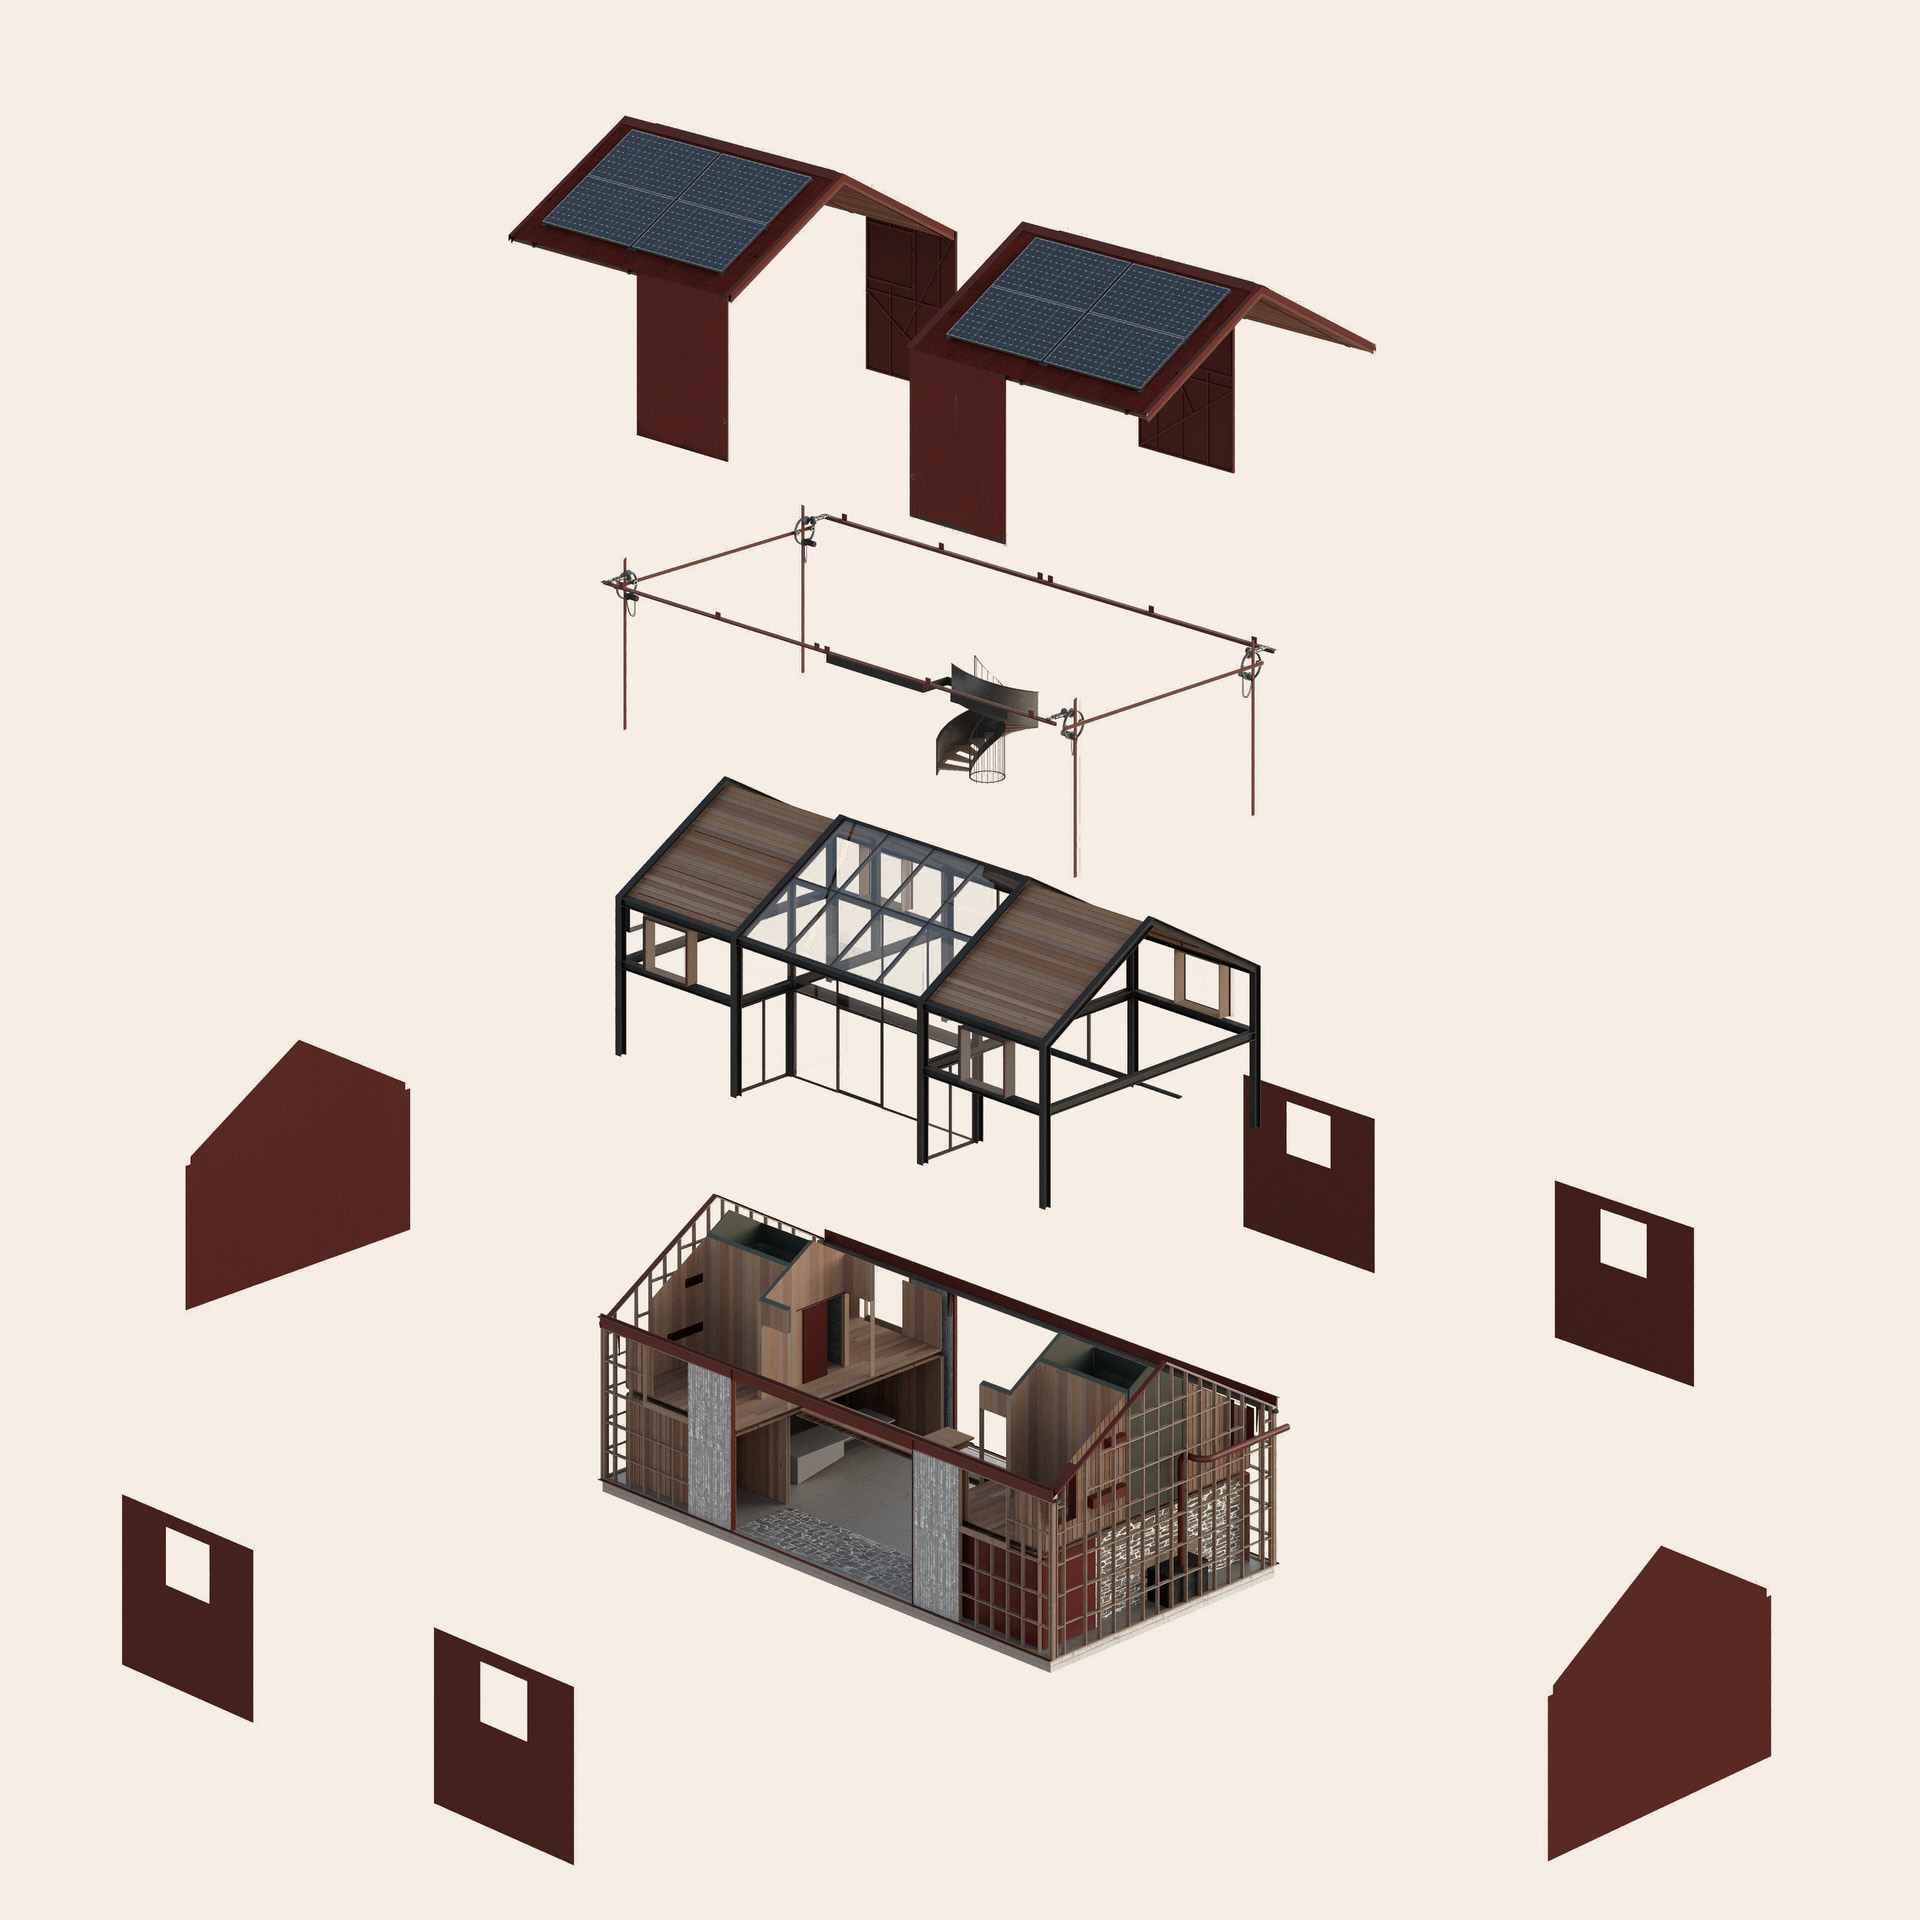
All the elements were poly modeled apart from the internal timber cladding. This was done using the CG-Source Floor Generator. Nothing was overly complicated to model as most elements were boxy. The mesh was quite dense, especially the corrugated iron, so it meant viewing the model in the viewport became a little annoying, but nothing you can’t overcome with a tidy file. I like to name all the objects and layers, making them easy to find and turn on/off.

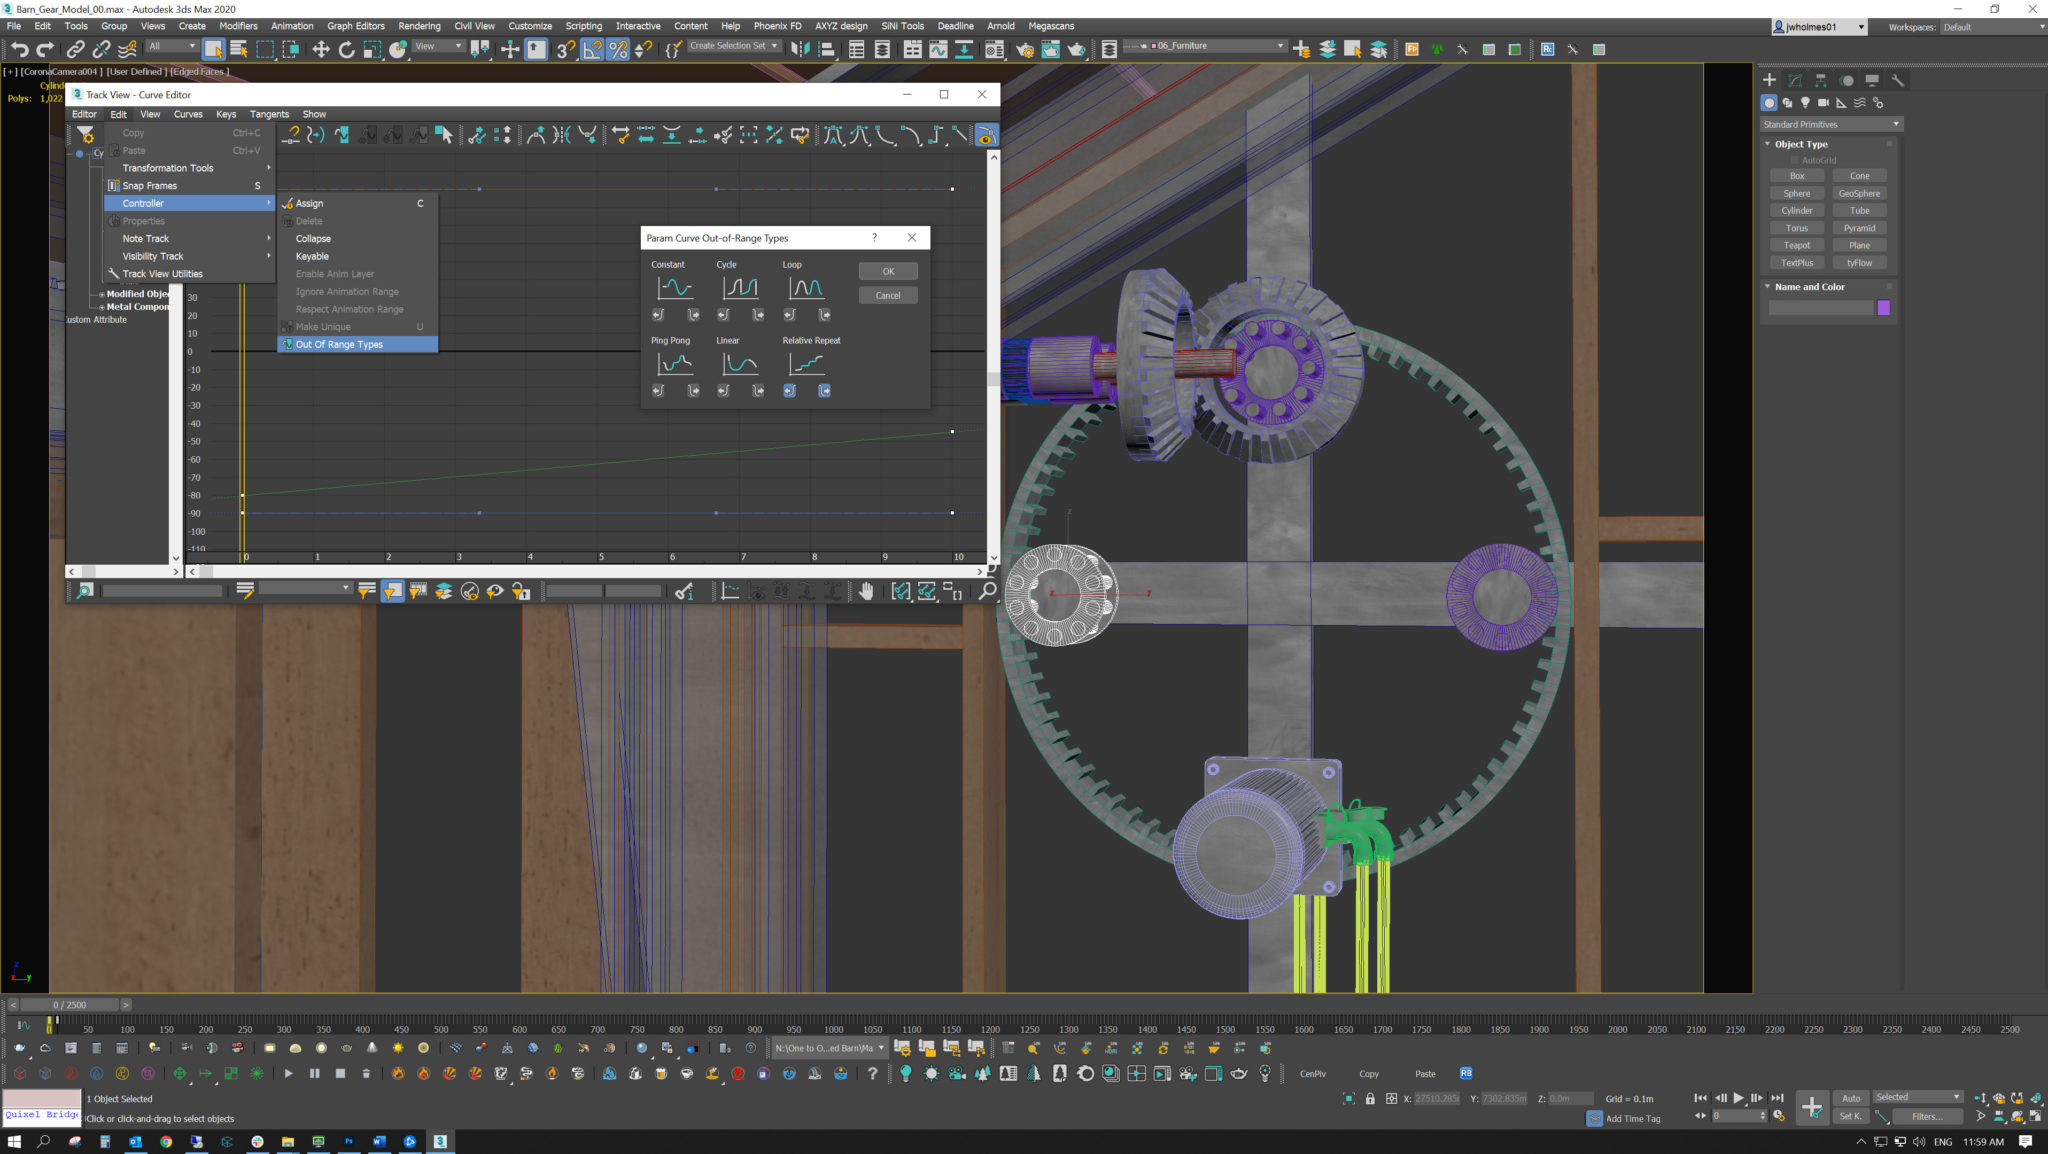
Retractable roof/mechanism
The gears for the retractable roof were animated each gear at a time and linked, so they stayed together. This was a relatively straightforward process, and using a tool inside the curve editor in 3da Max, it was easy to extend the animation of the gears, so it lasted the entire sequence. Because the gears are simply turning on one axis, this was not a complicated process.
The first thing I did was lay out all the gears to create a little more exciting setup than what you probably would have needed, but the gist of it is that an electric motor turned a gear in a ring that spun a bevel gear that turned another gear that was on a rack. The rack slides the roof open.
I then worked out how many teeth they each would need based on the size of the gears. Then I rotated the first gear over 10 frames and then the next, so it matched up and so on with the others all over just 10 frames.
Then for each gear, I went into the curve editor and selected Edit>Controller>Out of Range Types in the top menu, which brings up some options for what happens with frames that aren’t animated.
Because I wanted the gears to keep turning at the same speed as I pre-determined over 10 frames, I selected Relative Repeat.
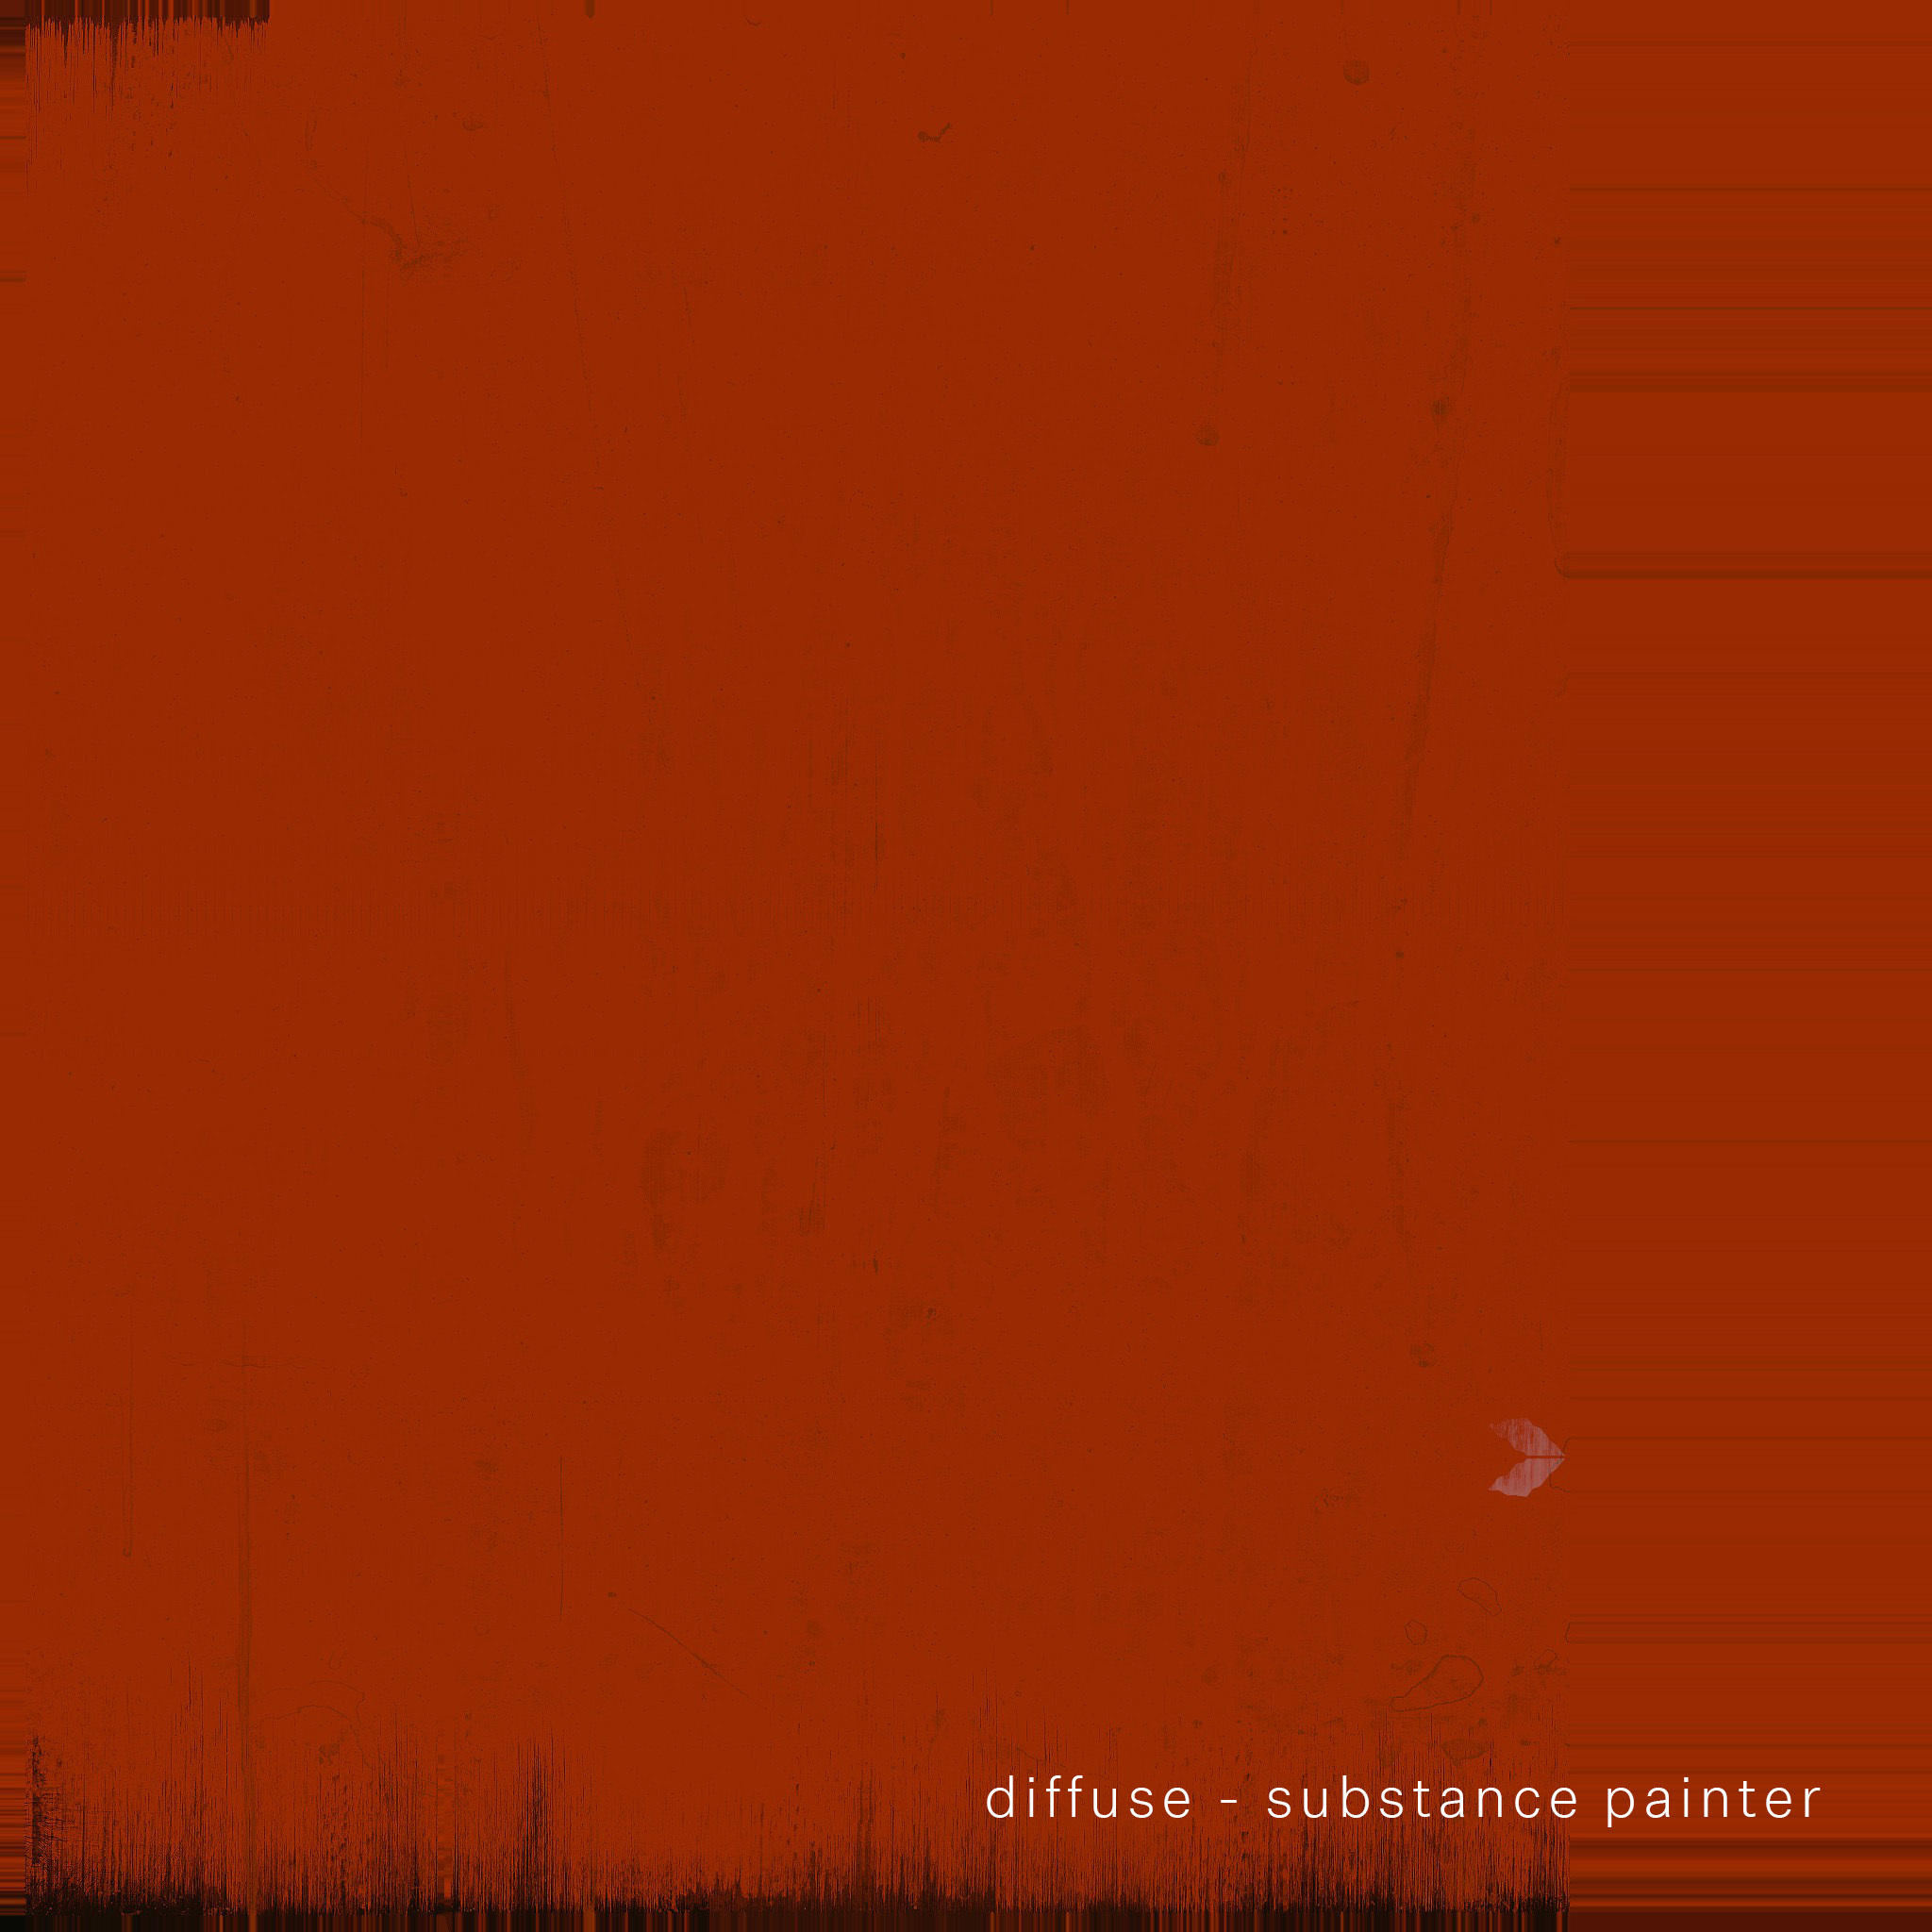
The “RED BARN” Materials – Substance & Corona Renderer
I wanted the exterior cladding to appear a little weathered, so this was a good test for creating some materials in Substance Painter. It was a straightforward and quick process once I had gotten my head around how Substance works. Creating gritty materials was fast, and you could easily tweak them, so they looked different on other parts to avoid repetition.
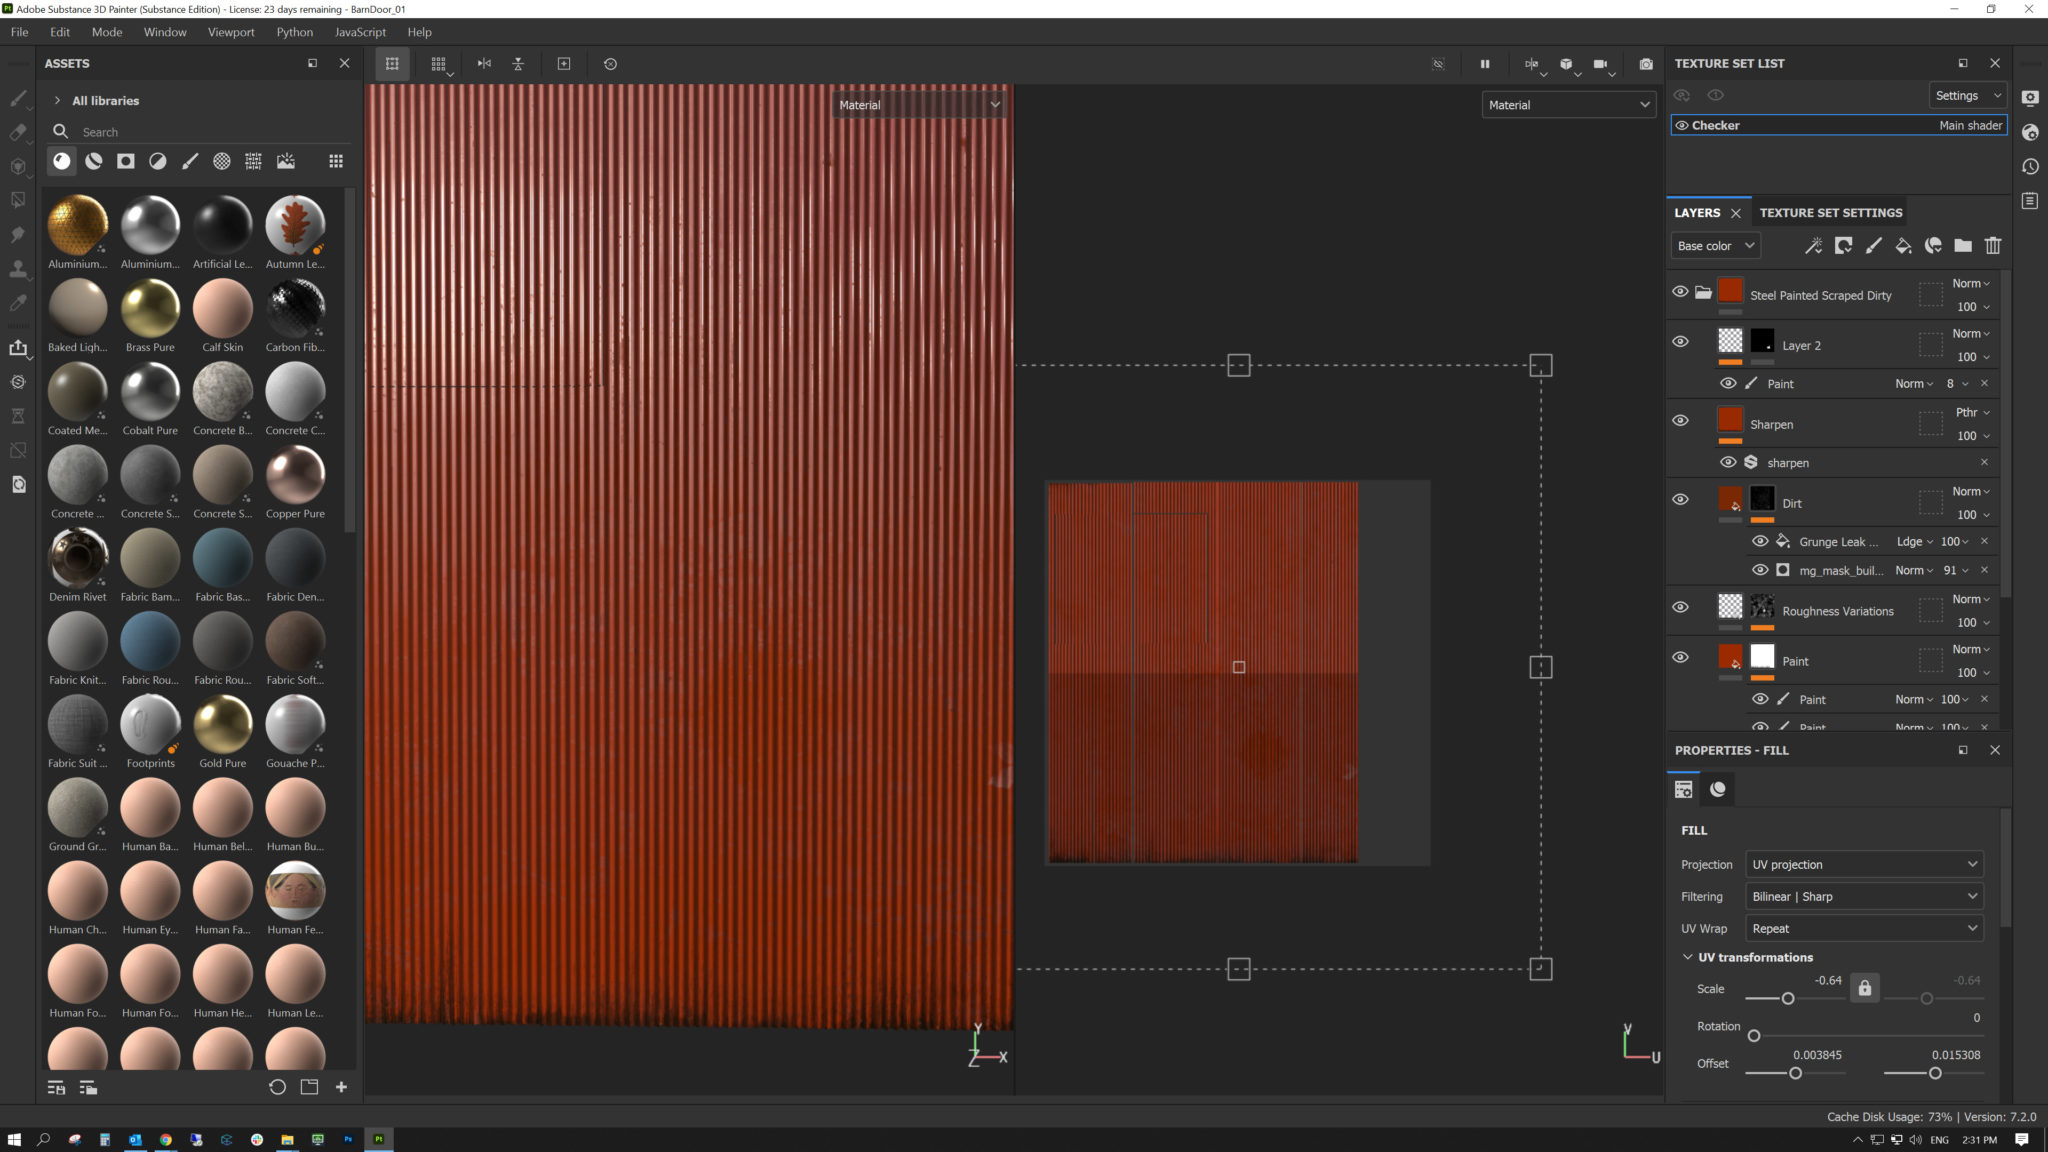
Another material of note I created in Substance Painter was the metal for the steel stair balustrade. I used the alpha brushes to paint the texture and create a patina effect for the steel, making it look like it had a raw finish.
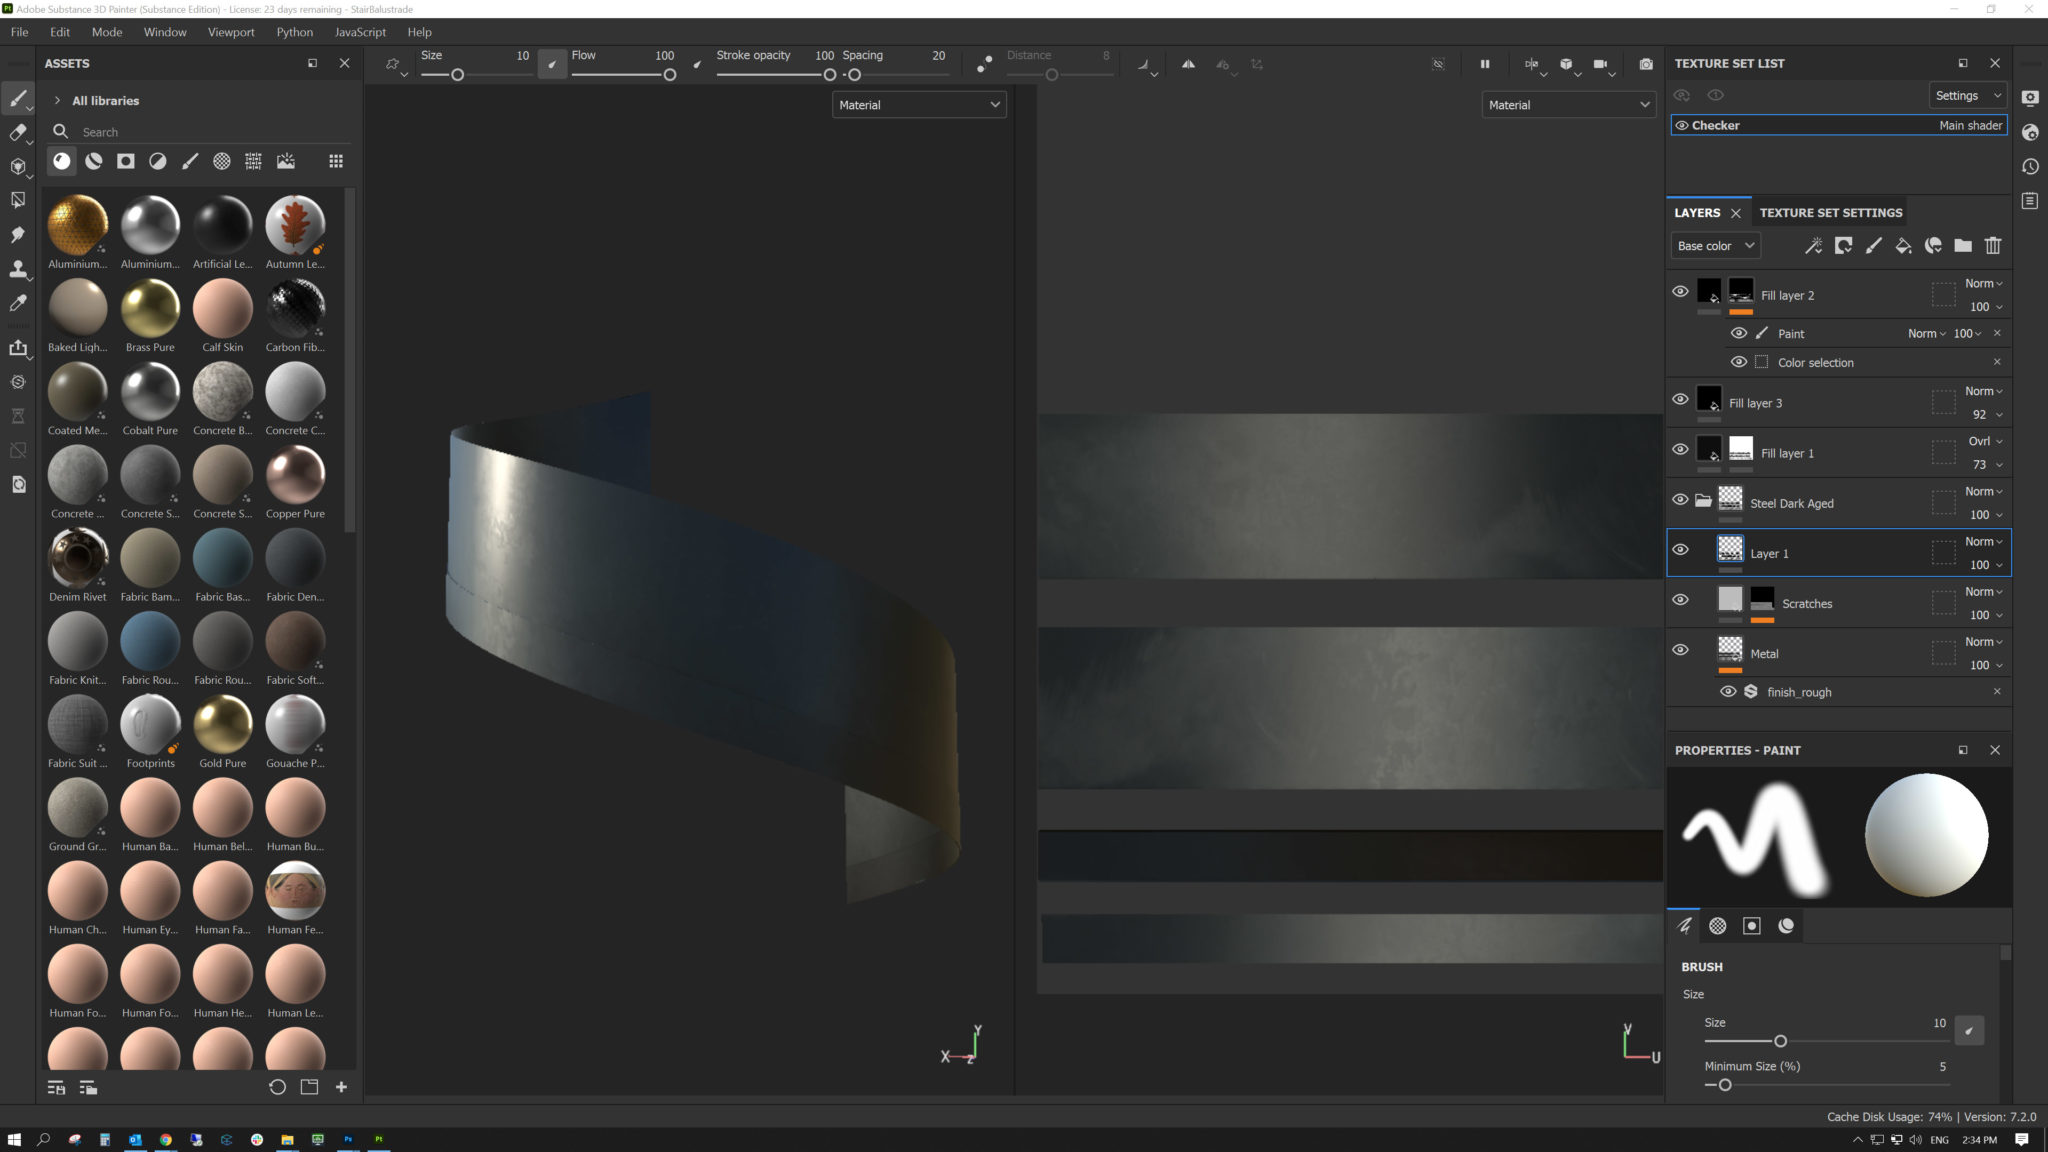
I still need to learn about Substance and their tools, but with the bit of time I have spent using them, I can see how they can take texturing to the next level.
General Materials
I kept the materials very simple for the project to render the animation as fast as possible. I planned that I would have roughly two weeks to render 3000-4000 frames. Here are some snapshots of some of the materials
Door Handle displacement
Another element of Interest is the carved front door handle. I painted a map in Photoshop and applied it as Corona Renderer displacement in 3ds Max.
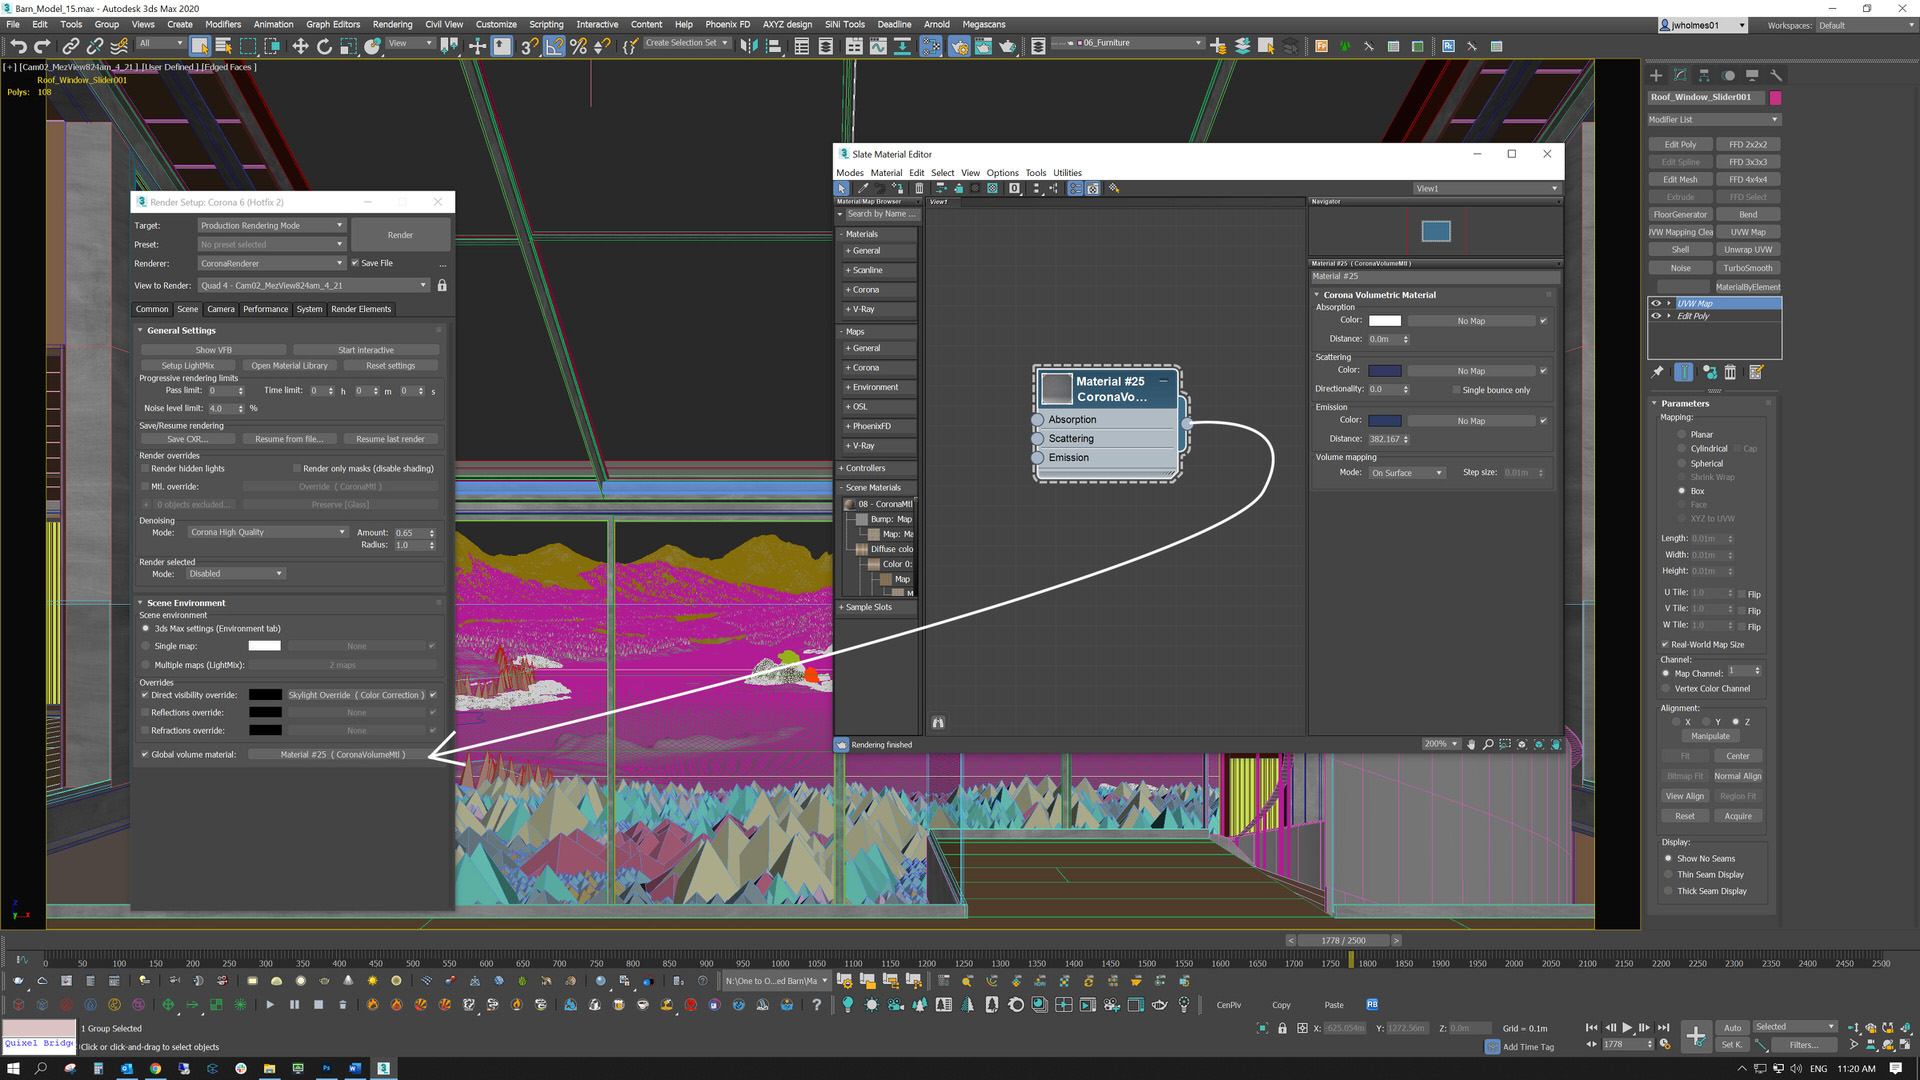
Volumetric Distance Fog
An essential part of large terrains is Distance Fog. This is a rendering technique that emulates atmospheric conditions caused by dust, humidity, pollution, etc. How the light is scattered causes objects off in the distance to fade into the sky. This really helps with the reality and believability of large environments.
In Corona Renderer 6, this effect is created by dropping a CoronaVolumeMtl shader into the Global Volume material slot in the “Scene” tab in the renderer settings.
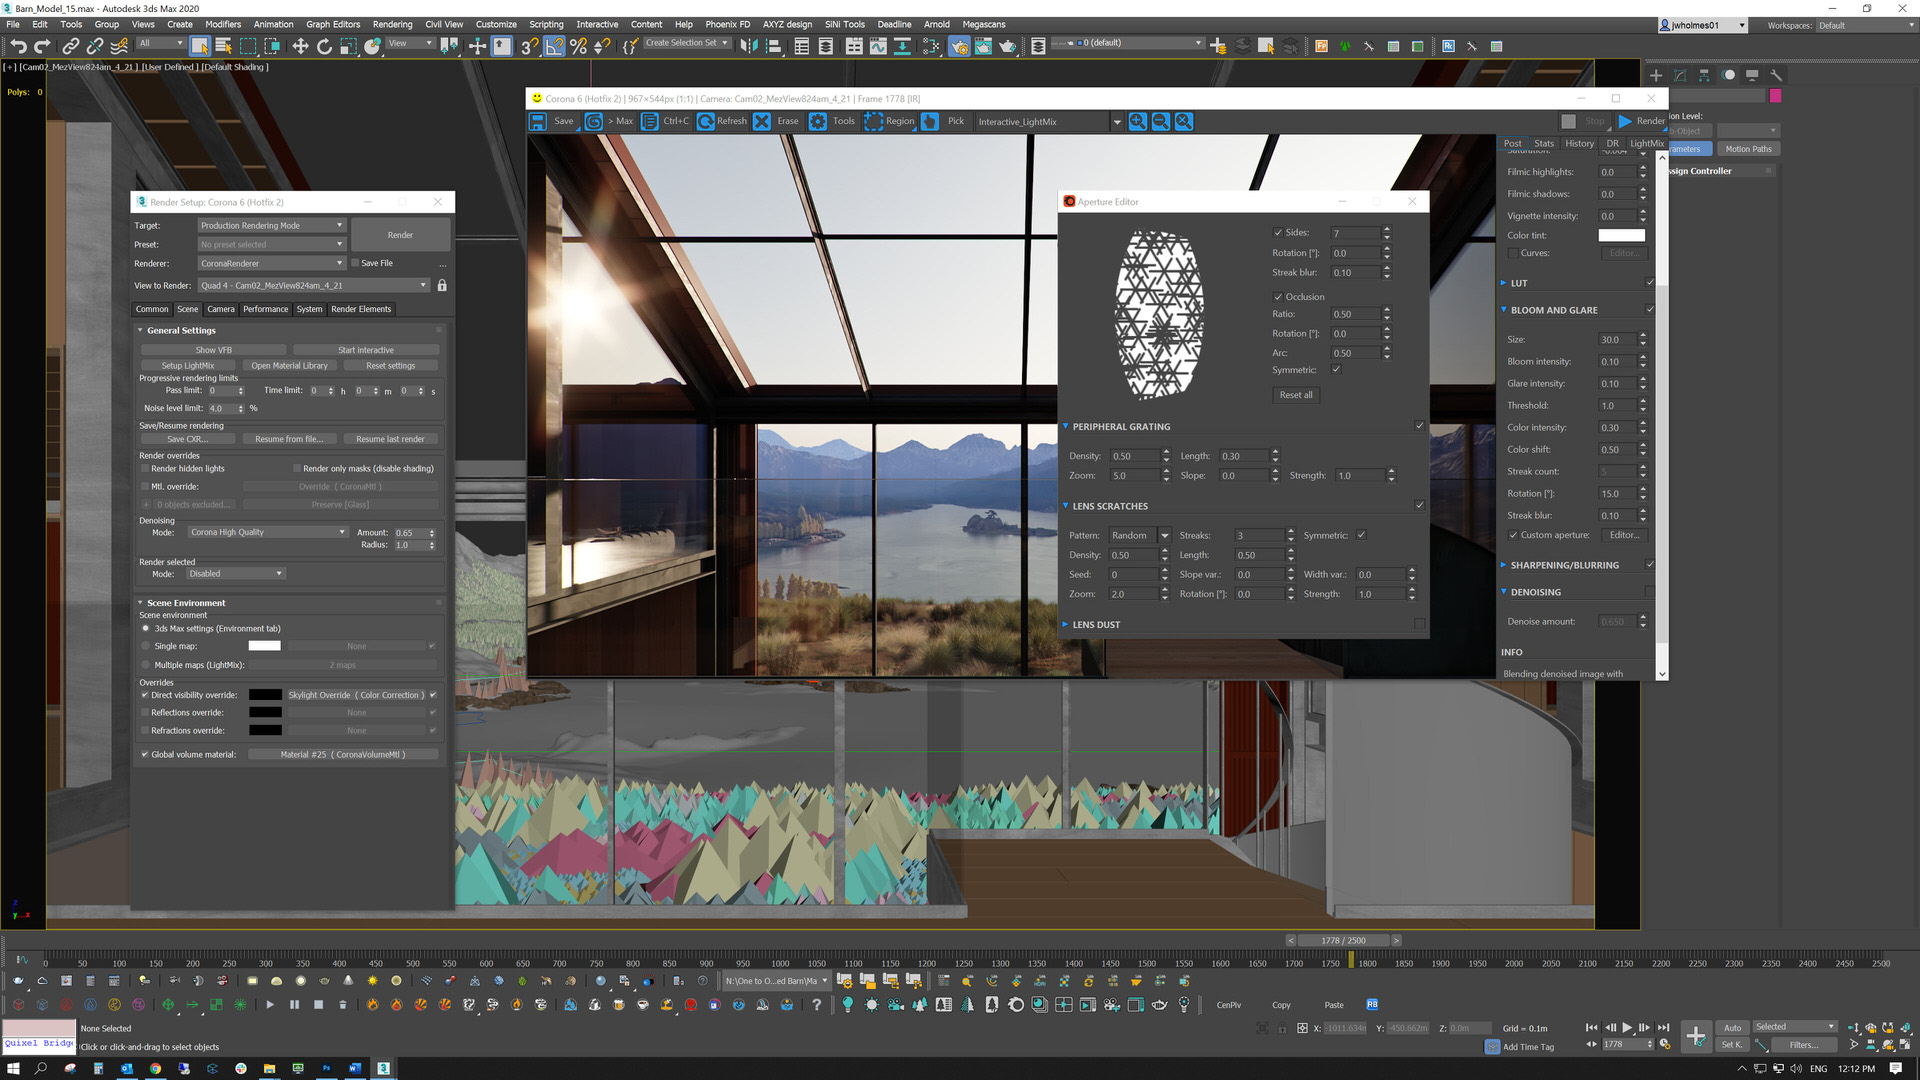
Corona Lens Flare
For a couple of the scenes, I rendered the lens flares in Corona. I haven’t really used this in the past, but I found you get some fascinating results. Here are my settings for the lens flare in this scene.
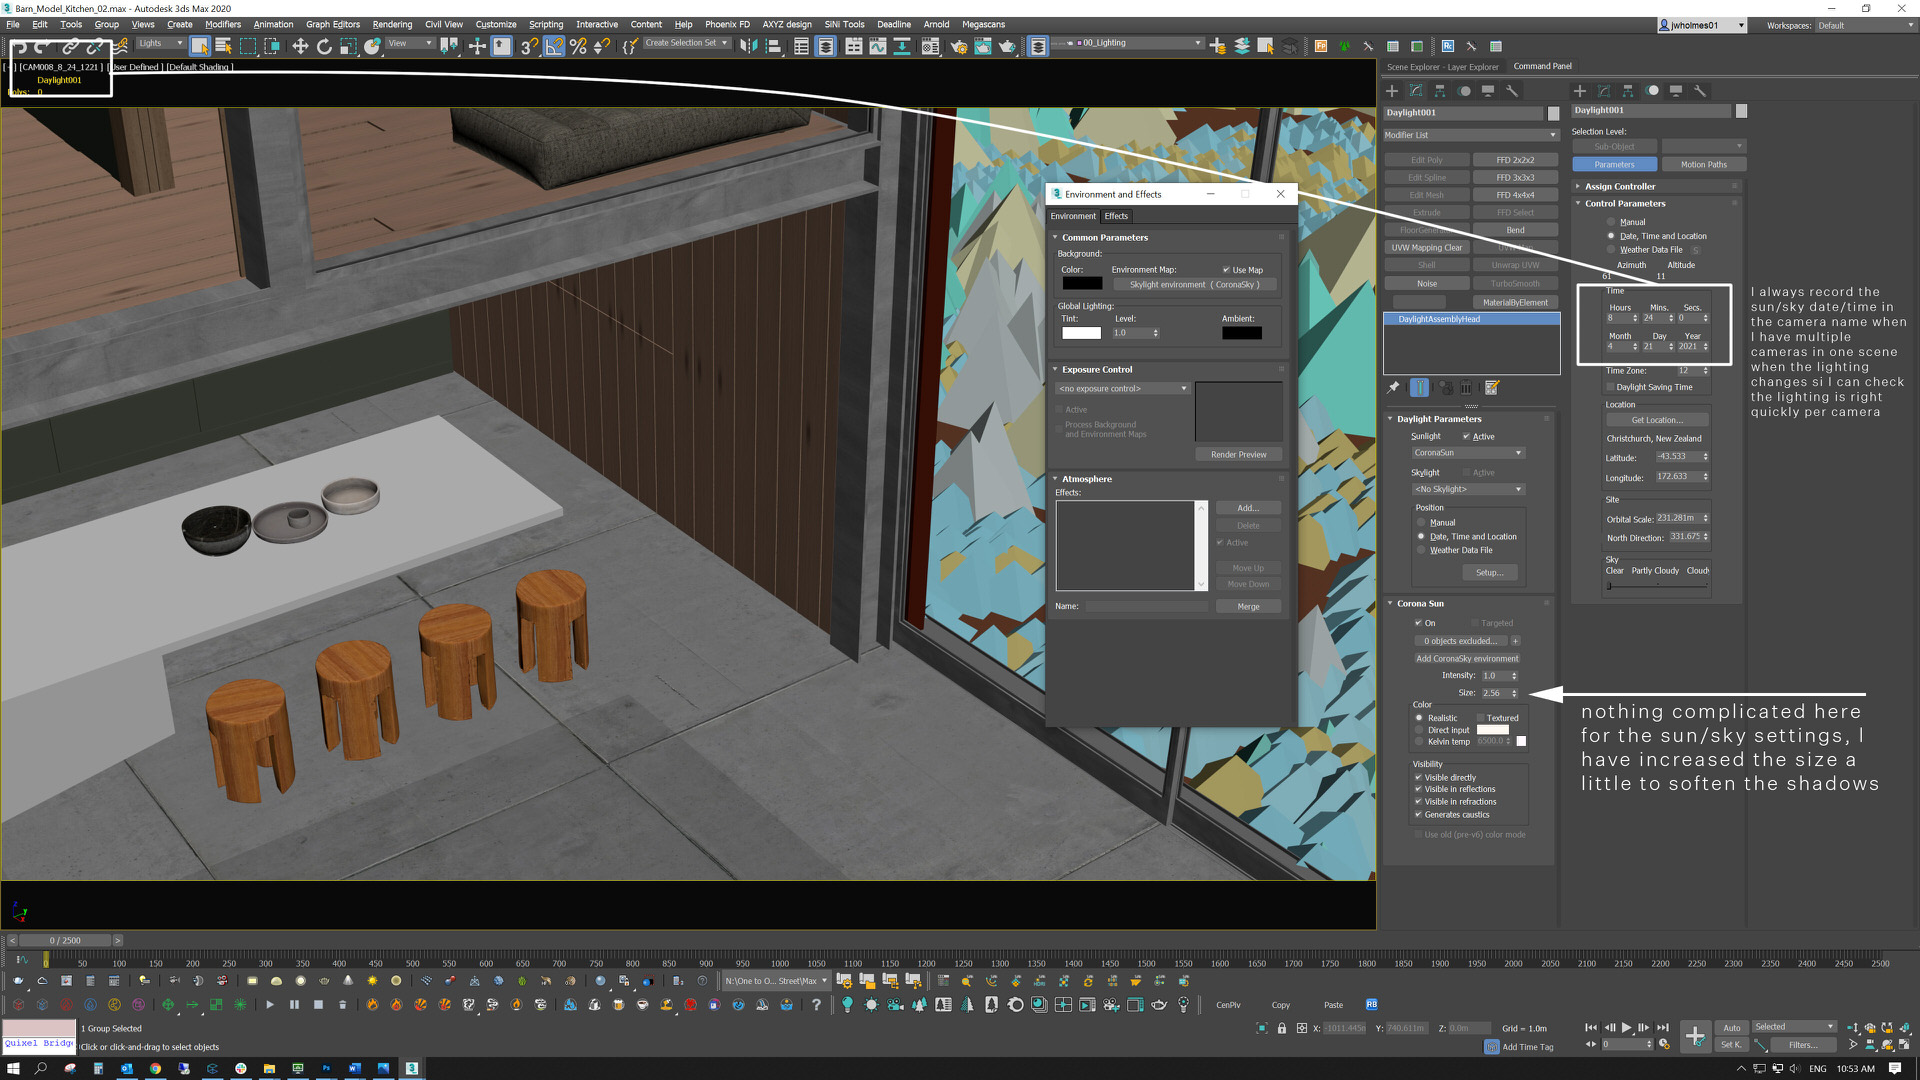
“RED BARN” Lighting & Mood
For the lighting of this project, I opted for an early morning feel – A new day is dawning; The Barn is opening for the impending arrival.
The sun is low, and the shadows are long. The lighting is a little moodier, and there is quite a contrast between light and the dark. I felt this helped the feel of the barn interior finishes and made the spaces feel more dramatic.
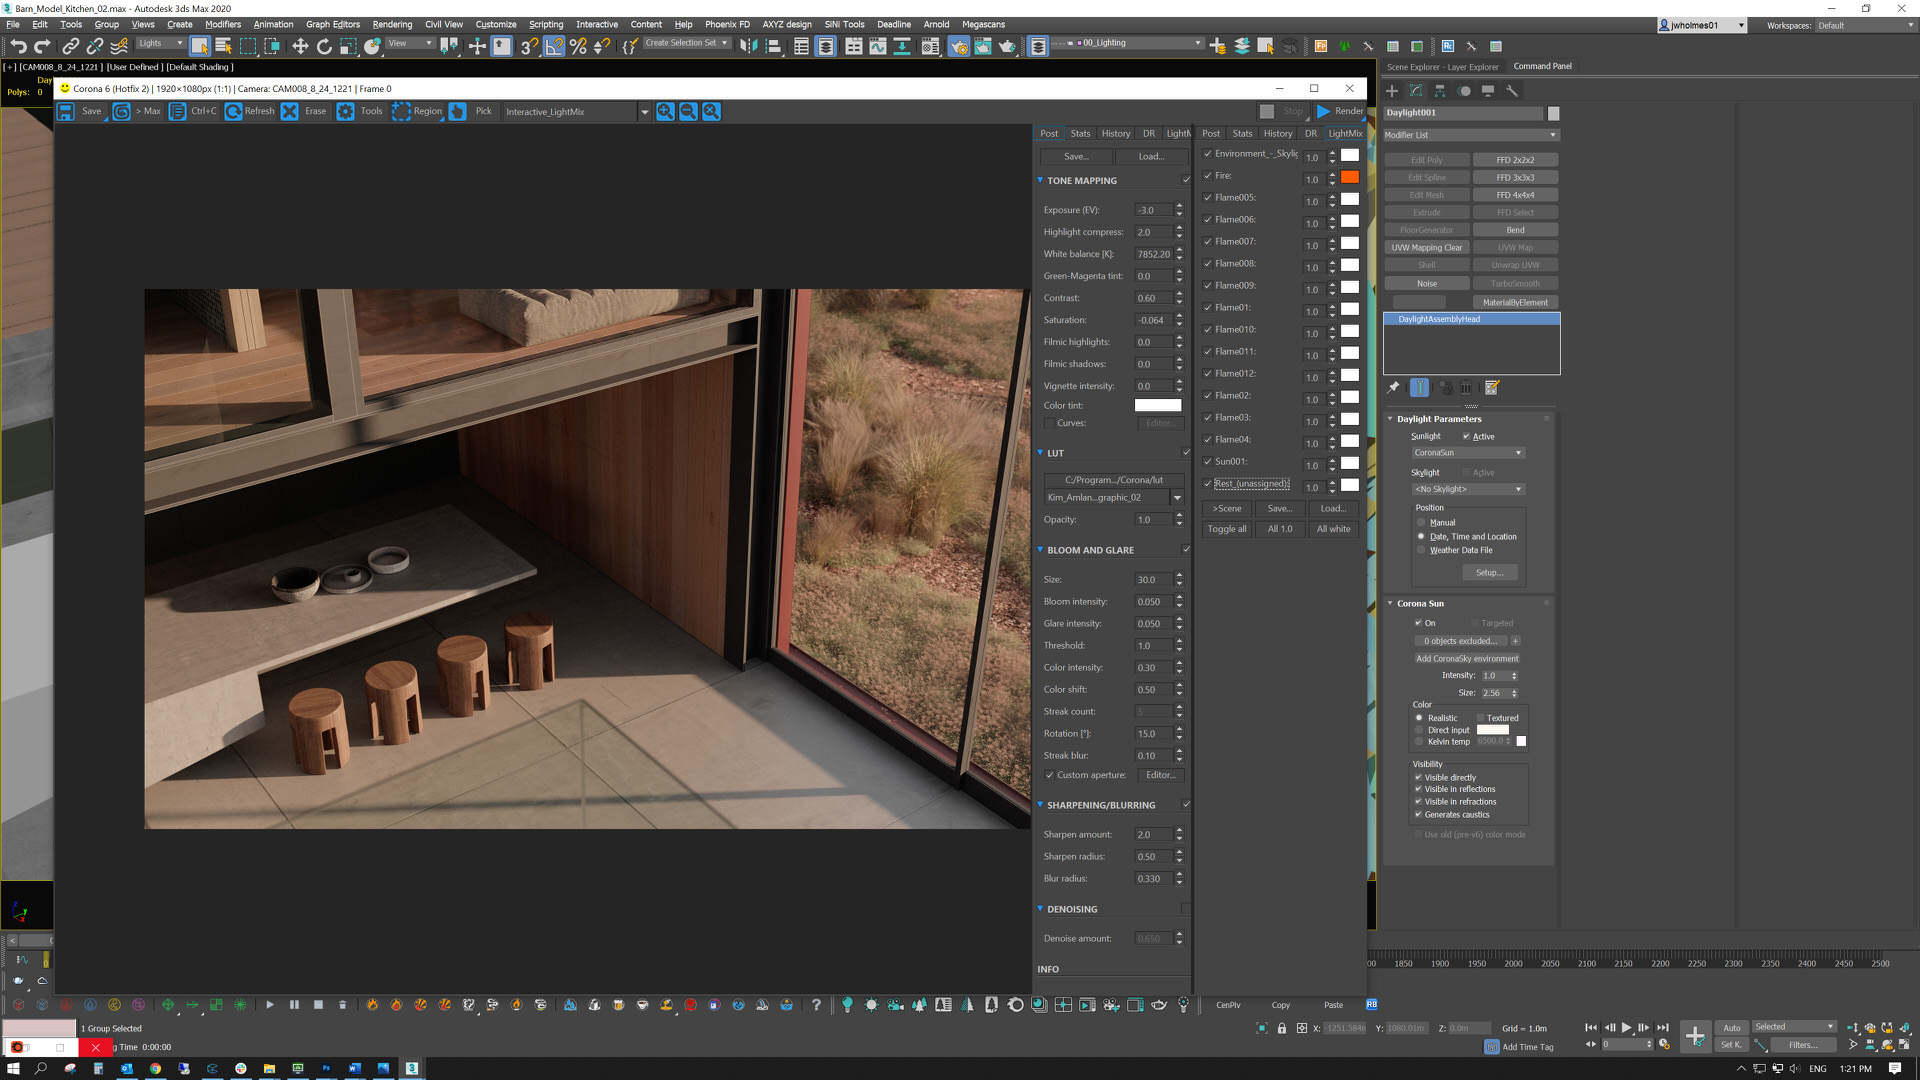
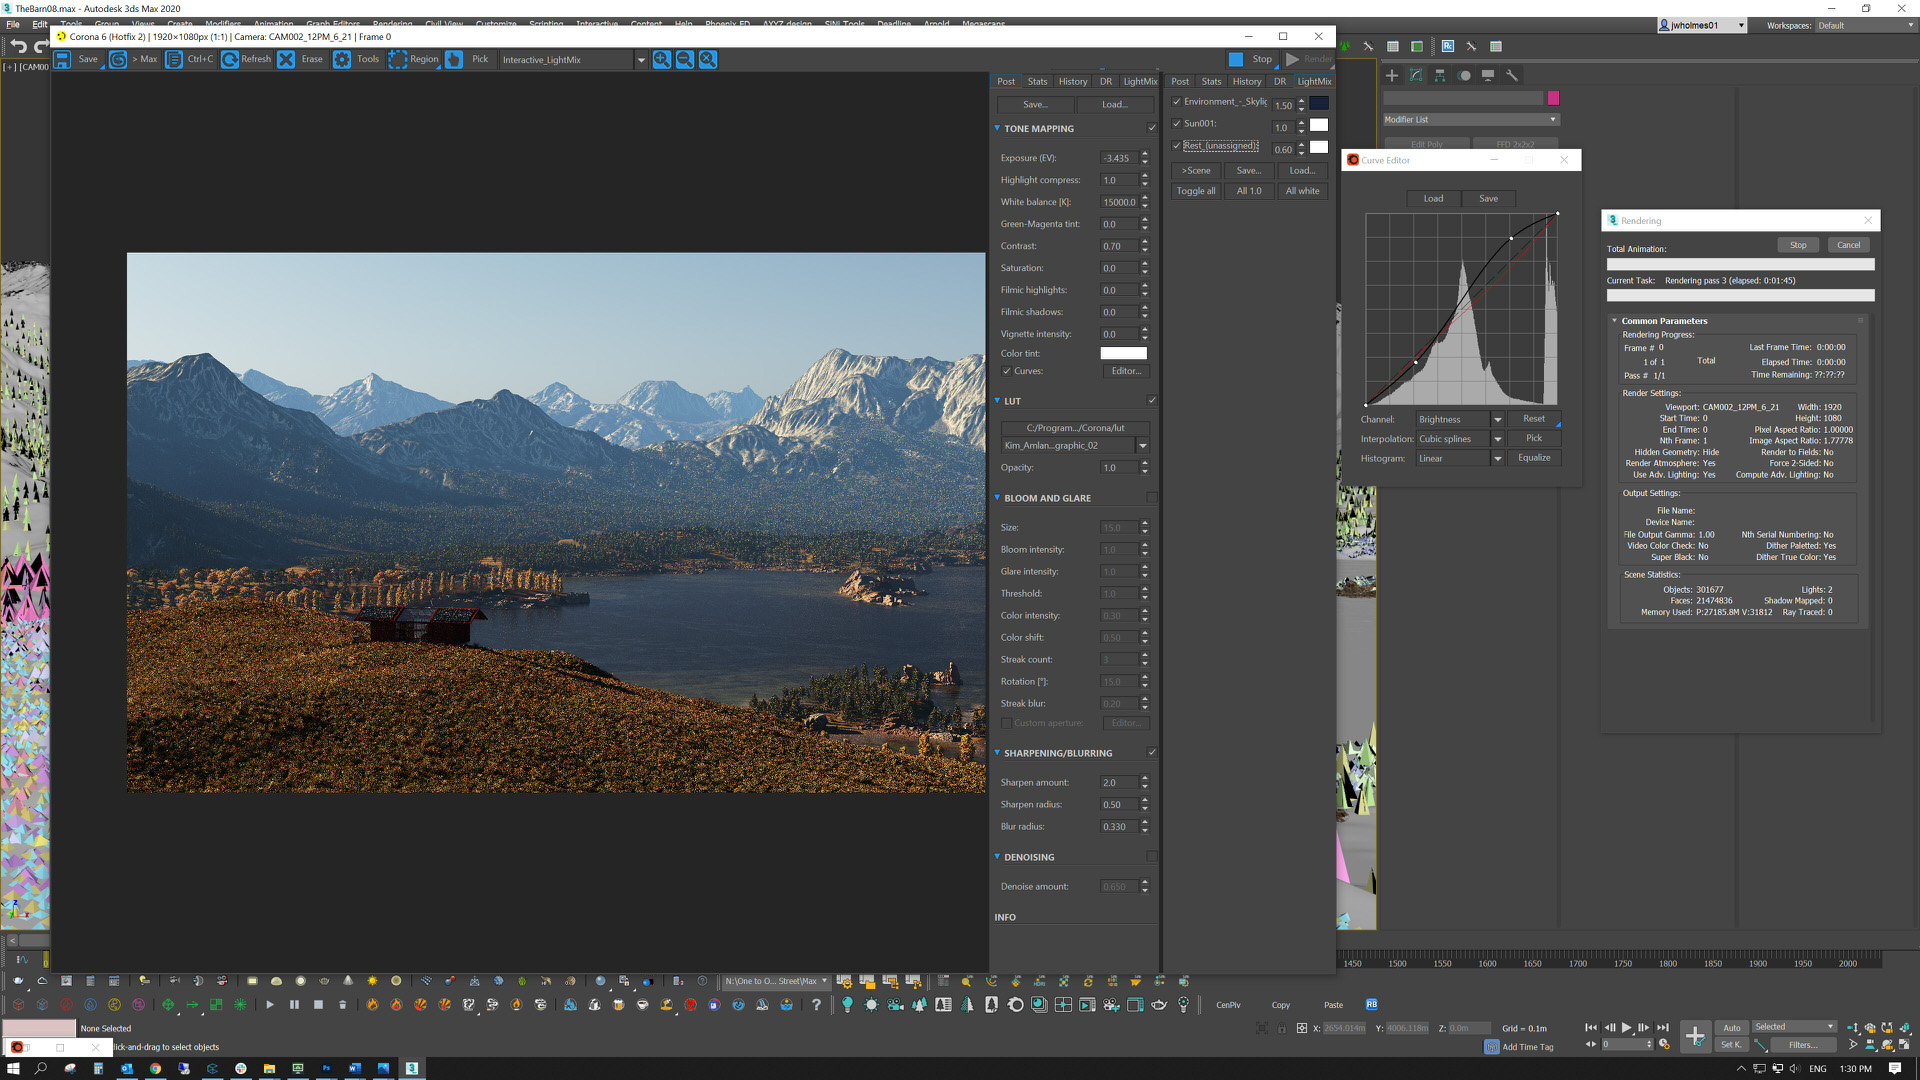
I used Corona Sun/Sky for the lighting for all the scenes, exterior and interior. A few other lights were created for light fittings in locations like the living and the master bedroom. But most of the light is from Sun and Sky.
Camera Set up
When I started to set up the cameras for the animation, I already knew that I wanted them to be slow-moving and be more cinematic. I had chosen the background track early on, and this provided me a good feel for the speed of the shots and how the overall animation would be edited.
Most cameras are eye level or just below front on angles, and they all truck either side to side or up and down. I avoided panning shots as those sequences usually have to be longer, and I wanted to show more barn spaces. In the final animation, there were 22 shots, but I had about 40 camera angles in total. The animation ended up longer than I anticipated, but I felt it was necessary for the final output, and I only rendered what I needed.
Animation
When I started the competition, I originally intended on producing still images. Still, the more I thought about it, I felt an animation would better showcase the Barn.
Because I had limited time to render out all the frames, I made sure that the scenes were as efficient as I could get them, and I didn’t have to rely on making lots of tweaks in Post. Some scenes have displacement, but I avoided it whenever I could. As I mentioned back in the materials section, I sometimes chose not to reflect on some materials just to reduce render times. I did many test renders of each camera to make sure I didn’t have to render each scene multiple times. I have access to a small render farm, but it was jam-packed when I needed to render. Most of the frames were only rendered on a few PCs. I tried to keep the render times down as low as possible. Ideally, I would have rendered the frames out at 4K, so they were nice and crisp, but that just wasn’t possible in the timeframe and availability of computing power.
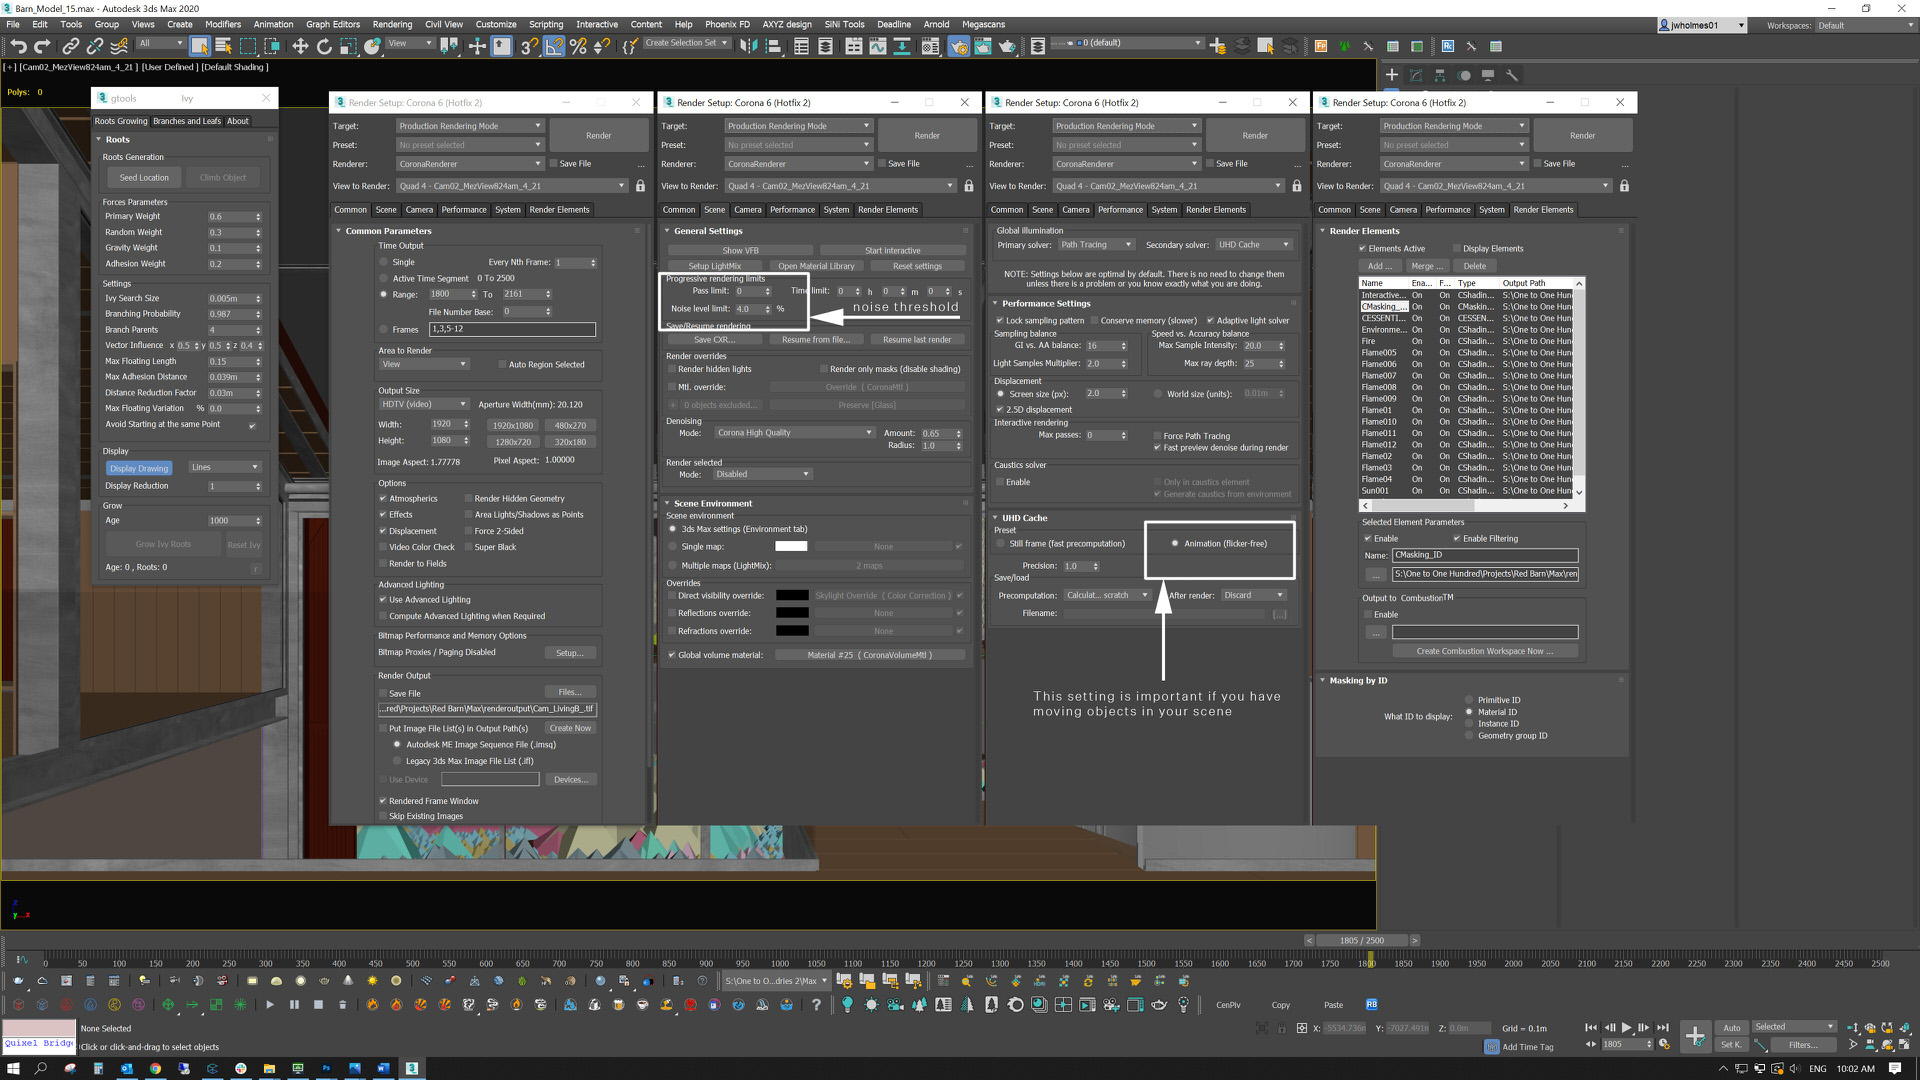
Because I used a high noise threshold in Corona, I knew that I would have to clean that up in Post. This is where Davinci Resolve comes in – It has incredible Noise Reduction Tools.
Image – Davinci Denoise 084
Davinci Resolve
I am by no means an expert in Davinci – in fact, I had to google how to do a lot of what I needed to do while putting this together. I usually use the Adobe suite for putting together animations. Still, I thought I would give Davinci Resolve ago because I knew it had some excellent tools, and I just like learning new software. Also, I can tell you that there are a lot of excellent tutorials online.
Post process video…
Final Words
Thank you again to everyone involved, and congratulations to all the competitors.
For me, the success of a project like this is about planning. I thought about what I might do for a couple of weeks before I even started doing any modeling. I had decided early on what I wanted from the end product and worked backward from the output to create a brief for myself, but always keep in mind an excellent reverse brief doesn’t always work out. Sometimes things change, and you have to adapt.
Just keep at it, and you will get there!